Reproducing the DeusDao exploit with Diligence Fuzzing
On May 6th 2023 DeusDao was exploited resulting in $6.5M in losses. A detailed write-up of the event can be found here. The root cause of the exploit, was a logical error in the burnFrom function.
function burnFrom(address account, uint256 amount) public virtual {
    uint256 currentAllowance = _allowances[_msgSender()][account];
    _approve(account, _msgSender(), currentAllowance - amount);
    _burn(account, amount);
}
On the first line of burnFrom, the message sender and account are accidentally swapped when computing the allowance for tokens to burn. As a result, the allowance of the message sender for account is used, instead of the allowance of account for the message sender. An attacker may exploit this by first calling approve(victim, N) for some victim address, followed by burnFrom(victim, 0). As a result due to the call to _approve on the second line of burnFrom, the attacker will be approved to spend N of victim’s tokens.
Vulnerabilities like this can be prevented by:
-
Writing a detailed specification for what the code should do
-
Checking that the code respects the specification
In this post we will demonstrate how this can be achieved by writing a specification using Scribble, and checking that specification with Diligence Fuzzing.
Getting Started
You can get the code for DeusDao from here. Note that in this version, the vulnerability has already been fixed. So first we need to re-introduce the vulnerability, by replacing the body of burnFrom in contracts/ERC20/ERC20Custom.sol with the vulnerable implementation shown in the previous section.
Next you will need:
- A Diligence Fuzzing account (you can obtain a free trial account)
- Scribble (you can install it by running
npm i eth-scribble) - The Diligence Fuzzing CLI (you can install it by running
pip install diligence-fuzzing)
Writing the Spec
One way to express the safety property that is being violated is:
”Only the owner may increase the allowance for someone to use their tokens"
Scribble allows us to easily express this property as an annotation on the internal _approve method:
/// #if_succeeds "Only the owner may increase an allowance"
///     old(_allowances[owner][spender]) < _allowances[owner][spender] ==> msg.sender == owner;
function _approve(address owner, address spender, uint256 amount) internal virtual {
    require(owner != address(0), "ERC20: approve from the zero address");
    require(spender != address(0), "ERC20: approve to the zero address");

    _allowances[owner][spender] = amount;
    emit Approval(owner, spender, amount);
}
The property is expressed as a docstring above the function, starting with the #if_succeeds keyword. The property includes a user-readable description, and the actual property expressed as the predicate:
old(_allowances[owner][spender]) < _allowances[owner][spender] ==> msg.sender == owner
The predicate precisely captures the safety property we expressed in English earlier. For more info on Scribble specs please see the docs.
Checking the Spec
Even just writing down a formal specification is a useful exercise, that improves code quality and often leads to discovering bugs. However, a specification is much more useful if we actually check that the code respects it. There are many ways to do this, ranging from manual inspection, to automatic and semi-automatic verification.
We will use Scribble + Diligence Fuzzing to check that the underlying code matches the specification by automatically converting it into executable checks inserted in the code, and then fuzzing the instrumented code. There are several steps to this.
Generating a config
First, we need to generate a fuzzing configuration by running fuzz config generate. The CLI tool will ask us several helpful questions, such as where the code lies and what kind of tool chain we are working on. Afterwards it will store the config in .fuzz.yml. We also need to add our fuzzing api key to the config (you can generate one from the fuzzing dashboard after logging in):
key: “….”
Instrumenting the specification
Next we need to convert our spec into executable checks. This is done by running:
$ fuzz arm
If you’re curious, take a look at the _approve function in contracts/ERC20/ERC20Custom.sol to see the changes done by our tools. You can always undo all these changes by running fuzz disarm.
Generating a seed state
After instrumentation we need to generate the seed state for fuzzing. We do this by writing a small script that deploys the contracts we want to fuzz to a local node. For example, we used the script below:
const { setBalance } = require("./helpers/modify_chain.js");

async function main() {
  const deployer = await hre.ethers.getSigner();
  const deployerAddr = deployer.address;
  const trustyAddress = deployerAddr;

  await setBalance(deployerAddr);

  const contractInstance = await hre.ethers.getContractFactory(
    "DEIStablecoin",
    deployer
  );
  const contract = await contractInstance.deploy("DEI", "DEI", trustyAddress);
  await contract.deployed();

  console.error(
    `DEIStablecoin deployed to ${contract.address} by ${deployer.address}`
  );

  return;
}

main()
  .then(() => process.exit(0))
  .catch((error) => {
    console.error(error);
    process.exit(1);
  });
Now we can start a local ganache or hardhat node, and deploy our contract to that node by running:
$ npx hardhat run --network localhost scripts/deploy.js
...
DEIStablecoin deployed to 0x0C1Ad3a67Ad77f99ac643B230D56093f3Cf2A54C by 0x7ef39802d1949909b21eDB40392e88B46AEa6c7d
The state of the local node is what we call the seed state.
At this point we are almost ready to fuzz. We just need to put the address where the target contract was deployed in the deployed_contract_address field in the configuration file:
# The following address is going to be the main target for the fuzzing campaign
  deployed_contract_address: "0x0C1Ad3a67Ad77f99ac643B230D56093f3Cf2A54C"
Running the campaign
Now we are ready to start our campaign by running:
$ fuzz run
You can view campaign here: https://fuzzing.diligence.tools/campaigns/cmp_...
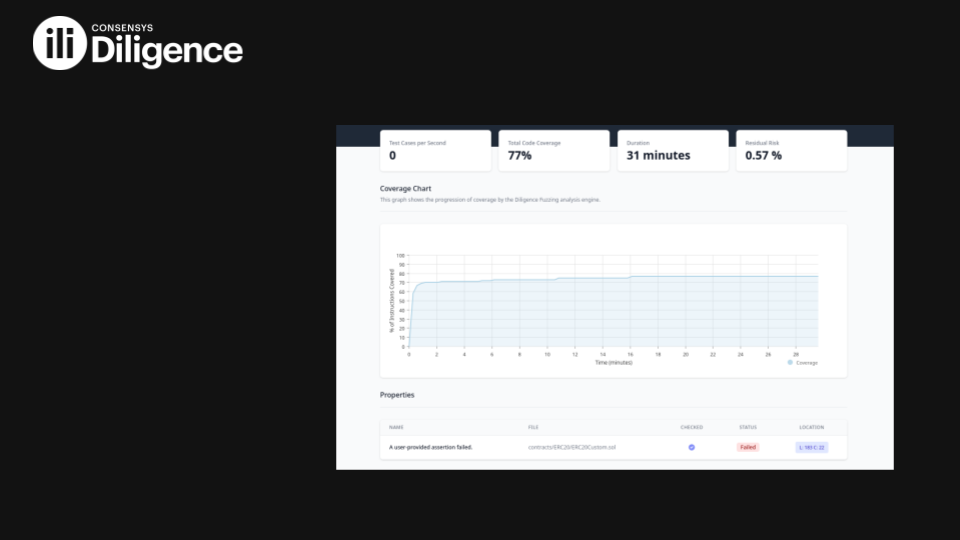
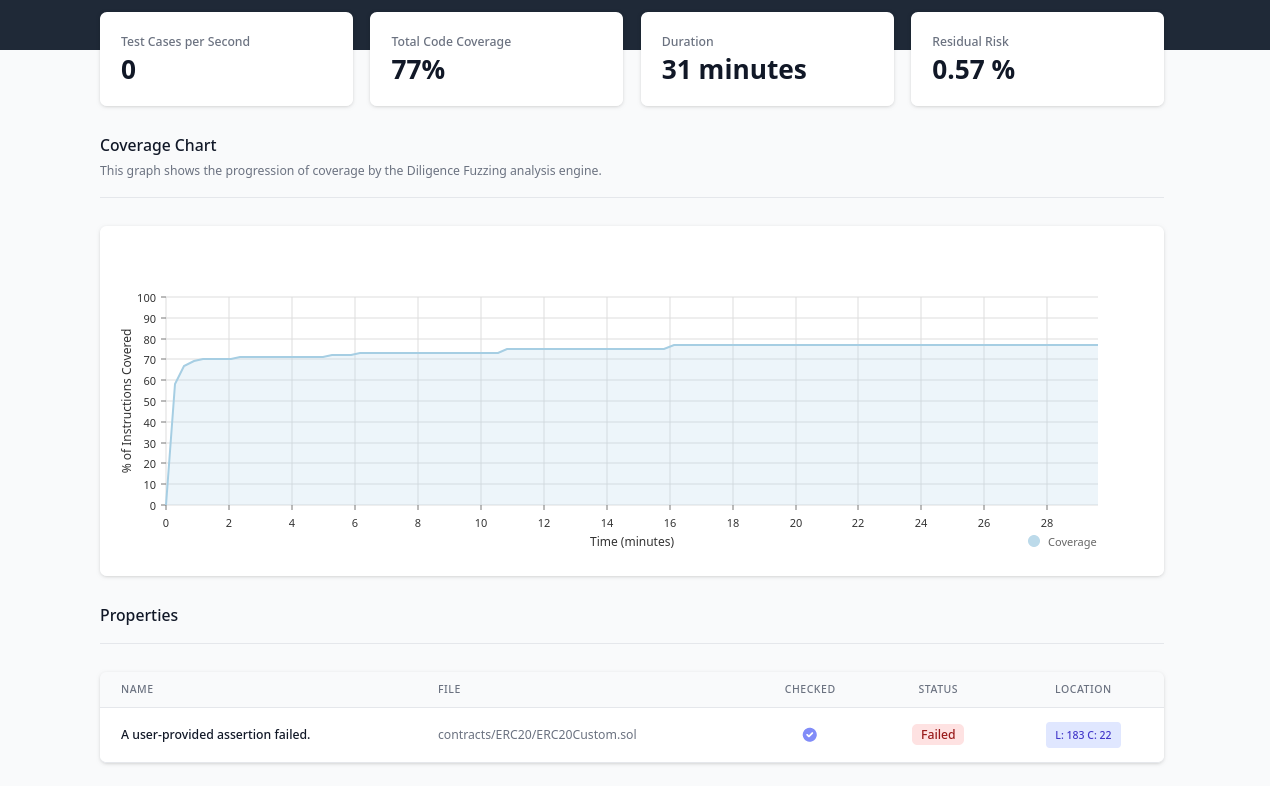
If we follow the link we will be led to the Diligence Fuzzing Dashboard, for this project. After some time (in my case about 20 min), the fuzzer will discover a violation to the property you expressed:
Clicking on the location brings us to the instrumented check in the code:
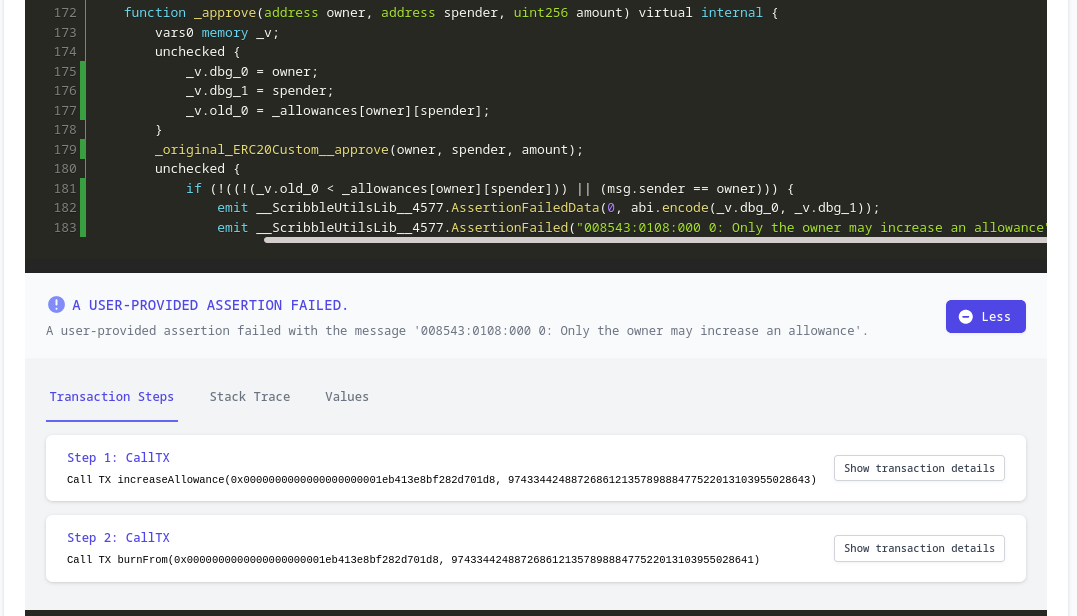
Below the line where the check was instrumented, the dashboard gives us additional information about the violation. Most notably, it shows the exact steps that the fuzzer took to violate our spec. In this case, these are precisely the steps that the attacker took as well:
-
Approve some victim contract for some amount of tokens (by calling
increaseAllownce) -
Call
burnFromwith that same victim contract
Thus the fuzzer was able to discover the vulnerability that led to the DeusDao exploit, given a simple Scribble specification.
Conclusion
Writing formal specifications for your contracts, and checking that the contracts correctly implement the specs is a powerful development practice. Diligence Fuzzing allows you to do just that, leveraging Scribble properties as a form of specification. As shown in this post, this technique can be useful in strengthening your code against real world exploits.
Thinking about smart contract security? We can provide training, ongoing advice, and smart contract auditing. Contact us.