
Trigger warning: The following tutorial contains elements of explicit cryptography, peer-to-peer financial services, and other transgressive behaviors. The examples are meant only to illustrate the power and ease of blockchain for Python.
Hey all yall Pythoners out there!
I’m really into the Python community. Like so many, Python was my first programming language. The Python hackathon and meet-ups are awesome. And, as a bonus point, I love Monty Python!
I thought I’d join all these loves together with my current job: showing developers how powerful blockchain programming can be, and how easy the skills are to pick up.
This will be a tutorial walking Python developers through the basics of Web3.py, a blockchain (Ethereum) library. We’ll do a lot of this from the Python interpreter. (In the next tutorial, we’ll set up a proper directory but we’re keeping things easy for now!)
Note: For security reasons, we’ll be sending our money over a test network. All of these same techniques can be used on the main Ethereum network.
Table of Contents
Installation
Setting up Connection
Initialization
Create an Account
ENS accounts
Send Money
Installation
We’re gonna use pip to install web3.py from our command line:
$ pip3 install web3
For people with both Python 2 and 3 installed, you should check to see which version pip command invokes. Some default to 2.7:
$ pip -Vpip 10.0.1 from /Library/Python/2.7/site-packages/pip-10.0.1-py2.7.egg/pip (python 2.7)$ pip3 -Vpip 20.0.2 from /usr/local/lib/python3.7/site-packages/pip (python 3.7)Also, if you’re using virtualenv, here’s some documentation about setting up a clean environment for Web3.py
Great! We’re on our way.
Setting Up Our Connection
Blockchain systems are decentralized networks made up of people running individual dedicated P2P software or “nodes”. It’s similar to a torrent network: To interact with the network, you either have to host a node or use a service that hosts one for you.
Since this is a basic tutorial, we’ll use a service. The most popular one is Infura. You can setup your own free account (instructions here) or you can use the Product ID below. It’s crucial you get a Project ID and API endpoint -- it will be our API endpoint to the blockchain and the analytics dashboard is helpful.
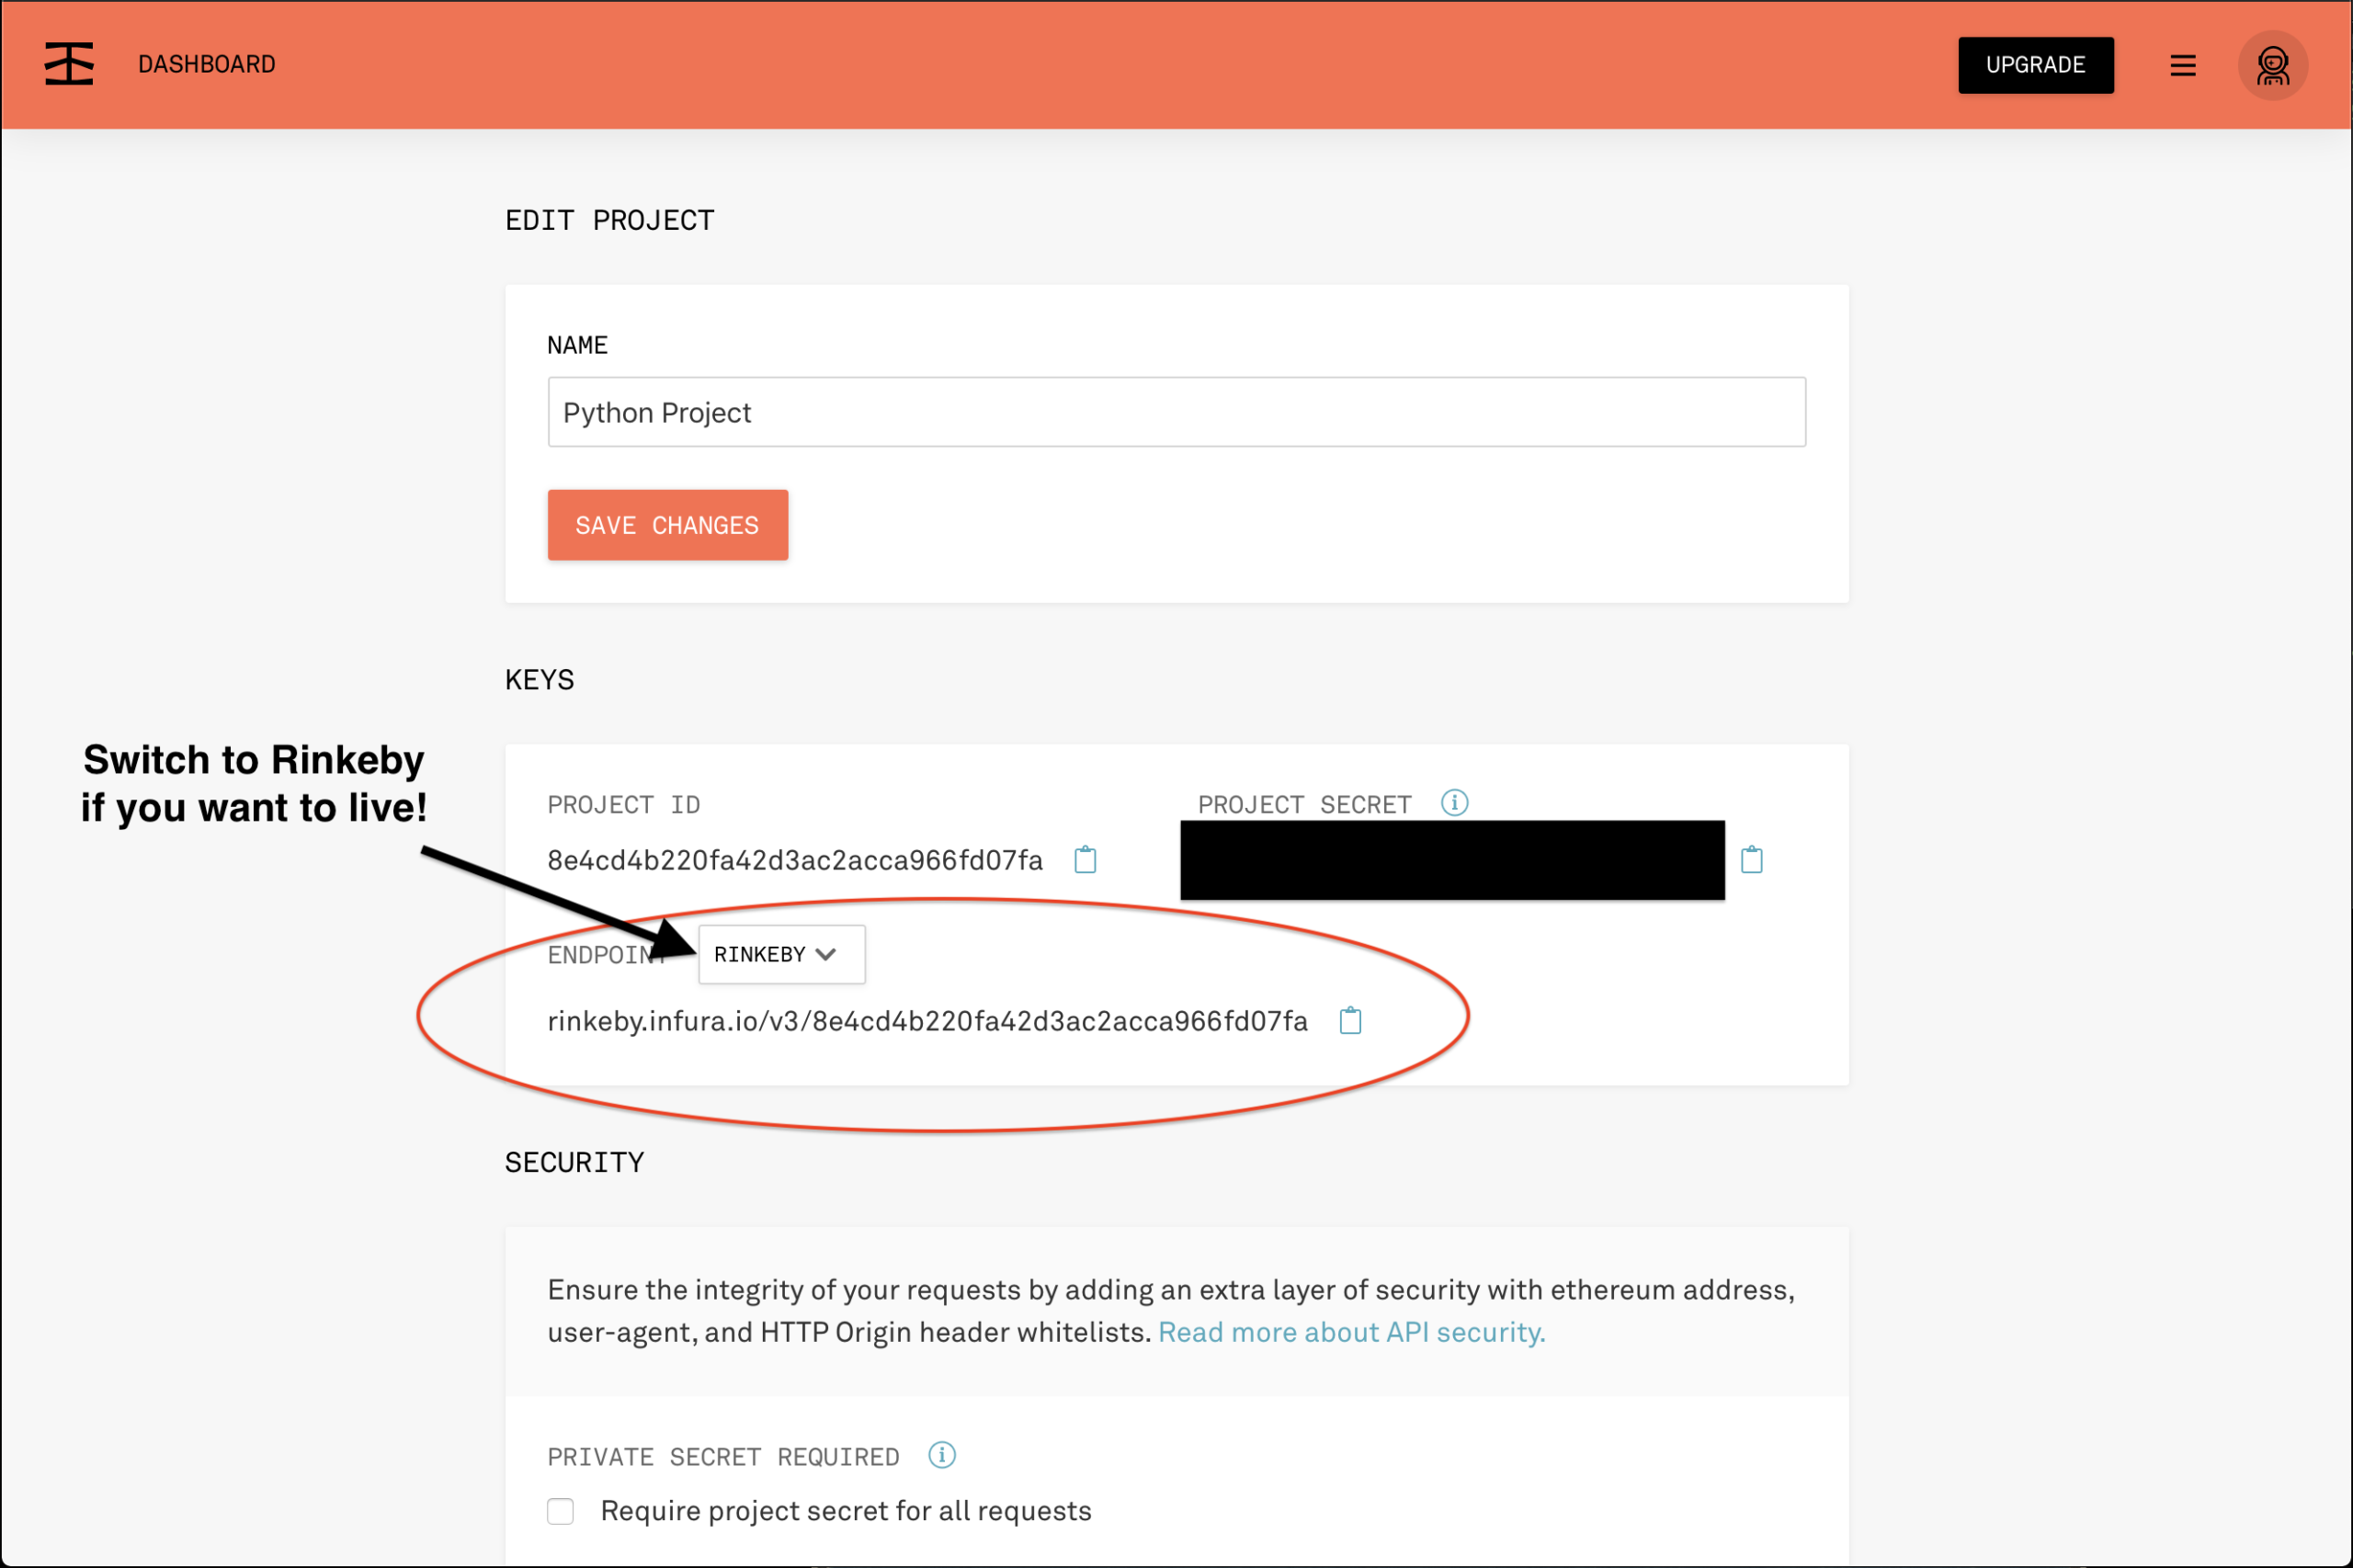
Copy the Endpoint and be sure to prepend https:// to the address.
Once you have that, you’re ready to connect to the blockchain using Python!
Initialization
Let's fire up our Python interpreter. This can vary depending on your Python installation, but is usually accomplished with running whatever keyword you typically put before a python file. For me on my Mac iTerm with both Pyton 2 and 3 installed, it’s:
$ python3
Python 3.8.2[Clang 6.0 (clang-600.0.57)] on darwinType "help", "copyright", "credits" or "license" for more information.>>> To check that all our setup is correct, please run your python interpreter and the following commands:
>>> from web3 import Web3, HTTPProvider>>> import jsonThe above command imports some of the main methods from web3.py we’re going to use to connect to the blockchain as well as the ever-faithful, native json library.
Next, we'll create an object, w3, which we initialize with our Infura API endpoint ( prepended with https:// ). It will become the main way web3.py works with the blockchain throughout the rest of the tutorial.
>>> w3 = Web3(Web3.HTTPProvider("https://rinkeby.infura.io/v3/8e4cd4b220fa42d3ac2acca966fd07fa"))
Note: You need to add HTTPS:// in front of your Infura API address, otherwise you’ll get an error!
We also need to add in some middleware to help us work with Infura and the Rinkeby testnet:
>>> from web3.middleware import geth_poa_middleware>>> w3.middleware_onion.inject(geth_poa_middleware, layer=0)Now, to see if all’s gone well, we run:
>>> w3.isConnected()
If you get True, congratulations! You’re connected to the blockchain!
If you get False, a few things you can check:
If you’ve had to restart the interpreter, you have to re-import the libraries and re-initialize the variables
Have you copied the Infura API key correctly?
Have you installed
web3.pyand installed and imported Web3 and HTTPProvider library?Have you prepended the API key with https:// ?
Create an Account
If we’d like to send money on the blockchain, we’ll need an Ethereum account. Ethereum accounts are the main unit of identity on the Ethereum blockchain -- an account’s address is how the user is identified on the network. Underpinning the account system is a decentralized identity protocol based on public key cryptography. Essentially, identity on a blockchain network is confirmed by authentication of digital signatures from a single private key (held in secret by a single user) by its public address counterpart (held by the entire network). While it has significant user experience hurdles, it does provide a fast, peer-to-peer authentication protocol.
Generating an account to use on the Ethereum network is super easy with web3.py.
Note: In the next few steps, I’m going to break a few rules of cryptography and security. 1) I’m going to generate a private key with inadequate entropy (randomness) and 2) I’m going to post a private key online. I’m not going to use this key beyond this tutorial—it’s just for educational purposes. You should always use proper private key management, like Geth or MetaMask, and never share your private key publicly.
>>> my_account = w3.eth.account.create('Nobody expects the Spanish Inquisition!')>>> my_account._address'0x5b580eB23Fca4f0936127335a92f722905286738'>>> my_account._private_keyHexBytes('0x265434629c3d2e652550d62225adcb2813d3ac32c6e07c8c39b5cc1efbca18b3')The above command uses the string input to generate the my_account object, which contains a private key (my_account._private_key) and its associated Ethereum address (my_account._address) . However, since this has been posted publicly, someone could generate and use the same private key. (Luckily, I’m just using it for this tutorial and only on a test blockchain network.)
For this reason, users typically delegate private key creation and management to software called clients (like Geth) or wallets (like MetaMask). These projects provide an incredibly secure way to generate and handle private keys for blockchain interactions.
ENS Accounts
Ethereum addresses are long hexadecimal numbers. They’re nearly impossible to type or remember, so the Ethereum community created the Ethereum Name System (ENS). It serves the same benefit of the Domain Name System, which replaces website server numbers (216.58.194.46) to human-readable names (google.com). Rather than a .com domain, most ENS names use a .eth domain.
For example, I have an Ethererum account at 0x4d3dd8471a289E820Aa9E2Dc5f437C1b2E22F598 but I’ve used ENS to map the more readable name coogan.eth to the address. If you type those into apps or projects that support ENS (such as web3.py!), it will substitute in the Ethereum hexadecimal address. Unfortunately, we won't be able to use it for this tutorial as .eth domain names only work on mainnet...but maybe in the next tutorial!
Send Money
For this last section, we’re going to send some money from the account we just created to another Ethereum account. All from the python interpreter!
A reasonable response to sending money is, “Isn’t this just internet funny money that’s always fluctuating with a downward trajectory?” And, yes, cryptocurrency USD prices are extremely volatile. This has caused hesitation from businesses -- why would you accept a currency with an uncertain price?
However, there’s a novel workaround built within the Ethereum ecosystem. Ethereum is called “the World Computer” because it’s a distributed system that allows developers to upload and execute their own code. Code uploaded to Ethereum in this way is called a smart contract. Once it's uploaded to the network, it becomes a standalone entity, with its own address, memory storage and network access. Smart contracts have given rise to a rich Ethereum developer community that is both creative and tireless in addressing challenges, like the inherent price volatility of blockchains.
In an attempt to create a stable source of value for Ethereum, a group of developers wrote and uploaded code to Ethereum called Dai. It’s a digital token that is always worth about $1 USD. (The technical details to achieve this stability are fascinating but beyond the scope of this tutorial -- if you’d like to read more about the mechanics you can find more here). Once we hold the Dai token, we can exchange it with other users for the same rate as US dollars. We’ll do that now!
(Note: to get Dai to an account different from the one in the tutorial, you can mint your own on the testnet using this contract address, Metamask and your own account. Follow the steps in the tutorial here)
Contract Instantiation
First, to interface with code that’s been uploaded by a developer to Ethereum, we need to know what methods the uploaded code exposes. Web3.py natively knows how to interface with the core Ethereum software, but needs guidance to interact with third-party code. We provide that guidance by providing Web3.py an Application Binary Interface (ABI). Similar to an Application Programming Interface (API), the ABI allows our machine to know what functions are available to us and what parameters those functions expect. ABIs are not available on the blockchain and are supplied by the developer on sites like Github or Etherscan.
Here's the testnet Dai ABI we'll be using, please click and copy the entire code snippet:
Note: this code is really long, take special care to copy it fully!
abi = '[{"constant":true,"inputs":[],"name":"name","outputs":[{"internalType":"string","name":"","type":"string"}],"payable":false,"stateMutability":"view","type":"function"},{"constant":false,"inputs":[{"internalType":"address","name":"spender","type":"address"},{"internalType":"uint256","name":"value","type":"uint256"}],"name":"approve","outputs":[{"internalType":"bool","name":"","type":"bool"}],"payable":false,"stateMutability":"nonpayable","type":"function"},{"constant":true,"inputs":[],"name":"totalSupply","outputs":[{"internalType":"uint256","name":"","type":"uint256"}],"payable":false,"stateMutability":"view","type":"function"},{"constant":false,"inputs":[{"internalType":"address","name":"from","type":"address"},{"internalType":"address","name":"to","type":"address"},{"internalType":"uint256","name":"value","type":"uint256"}],"name":"transferFrom","outputs":[{"internalType":"bool","name":"","type":"bool"}],"payable":false,"stateMutability":"nonpayable","type":"function"},{"constant":true,"inputs":[],"name":"decimals","outputs":[{"internalType":"uint8","name":"","type":"uint8"}],"payable":false,"stateMutability":"view","type":"function"},{"constant":false,"inputs":[{"internalType":"address","name":"spender","type":"address"},{"internalType":"uint256","name":"addedValue","type":"uint256"}],"name":"increaseAllowance","outputs":[{"internalType":"bool","name":"","type":"bool"}],"payable":false,"stateMutability":"nonpayable","type":"function"},{"constant":false,"inputs":[{"internalType":"address","name":"to","type":"address"},{"internalType":"uint256","name":"value","type":"uint256"}],"name":"mint","outputs":[{"internalType":"bool","name":"","type":"bool"}],"payable":false,"stateMutability":"nonpayable","type":"function"},{"constant":true,"inputs":[{"internalType":"address","name":"owner","type":"address"}],"name":"balanceOf","outputs":[{"internalType":"uint256","name":"","type":"uint256"}],"payable":false,"stateMutability":"view","type":"function"},{"constant":true,"inputs":[],"name":"symbol","outputs":[{"internalType":"string","name":"","type":"string"}],"payable":false,"stateMutability":"view","type":"function"},{"constant":false,"inputs":[{"internalType":"address","name":"spender","type":"address"},{"internalType":"uint256","name":"subtractedValue","type":"uint256"}],"name":"decreaseAllowance","outputs":[{"internalType":"bool","name":"","type":"bool"}],"payable":false,"stateMutability":"nonpayable","type":"function"},{"constant":false,"inputs":[{"internalType":"address","name":"to","type":"address"},{"internalType":"uint256","name":"value","type":"uint256"}],"name":"transfer","outputs":[{"internalType":"bool","name":"","type":"bool"}],"payable":false,"stateMutability":"nonpayable","type":"function"},{"constant":true,"inputs":[{"internalType":"address","name":"owner","type":"address"},{"internalType":"address","name":"spender","type":"address"}],"name":"allowance","outputs":[{"internalType":"uint256","name":"","type":"uint256"}],"payable":false,"stateMutability":"view","type":"function"},{"inputs":[],"payable":false,"stateMutability":"nonpayable","type":"constructor"},{"anonymous":false,"inputs":[{"indexed":true,"internalType":"address","name":"from","type":"address"},{"indexed":true,"internalType":"address","name":"to","type":"address"},{"indexed":false,"internalType":"uint256","name":"value","type":"uint256"}],"name":"Transfer","type":"event"},{"anonymous":false,"inputs":[{"indexed":true,"internalType":"address","name":"owner","type":"address"},{"indexed":true,"internalType":"address","name":"spender","type":"address"},{"indexed":false,"internalType":"uint256","name":"value","type":"uint256"}],"name":"Approval","type":"event"}]'
We need to parse it using json:
>>> abi = json.loads(abi)
We also need to tell web3.py where to find this code on the Ethereum network. We do so with the following code:
>>> address = '0xc3dbf84Abb494ce5199D5d4D815b10EC29529ff8'
We then use the ABI and the address to instantiate a smart contract object. This will give us access to the functions exposed by the code:
>>> dai = w3.eth.contract(address=address, abi=abi)
To test we've properly instantiated the contract, we'll call a function that tells us how much Dai is held by the contract:
>>> dai.functions.totalSupply().call()10100000000000101001376883458034812485564519(The balance may be different by the time you run this)
Building the Transaction
To transfer the Dai from our Spanish Inquisition account (my_account), we'll use the transfer function from the Dai smart contract, shown below:
We can see we need to pass in two parameters to the contract: to, which will be a hexadecimal Ethereum address and value, which is uint256. Dealing with unsigned integers of 256 bits (uint256) can be challenging for even seasoned developers. It's a testament to unusual programming that has to be done at the smart contract level and frequently trips me up. Web3.py has a method we can use to cast values from integer to the format required for this smart contract, toHex. Let's send 10 Dai, and since the amount we're sending is below 16, we'll just put a 0x on the front of it. For address, put the address to whom you'd like to send the Dai.
So our transaction currently looks like this:
transaction = dai.functions.transfer(TO_ADDRESS, 0x10)
These parameters are good for the Dai contract (we won't get an error there), but we need more parameters for our transaction to run on the Ethereum network. Those values are chainId, gas and nonce.
.buildTransaction({'chainId': 4, 'gas':70000, 'nonce': w3.eth.getTransactionCount(my_account._address)})ChainId helps
web3.pyknow to which network the transaction is being sent. Different networks have different quirks (as we saw when we installed themiddlewareat the beginning for Rinkeby) and this helpsweb3.pybundle the transaction correctly. Rinkeby's network ID is4, here's a complete list of network IDs..Gas is the small payment you make to miners on the network to run your transaction. Many people are surprised by this, but the amount is small (our transaction will cost 0.00007000 ETH, for example, but is demarcated in a particular denomination called Gwei).
Gashelps run the network in a decentralized and secure way.Nonce is a global variable particular to each Ethereum account. It serves the same purpose as the number on the bottom of the check: it allows for proper ordering of payments from different accounts. It increments up one after each transaction sent.
Web3.pyhas a method for finding the currentnonceof the address:w3.eth.getTransactionCount(ETHEREUM_ADDRESS).
We'll use the web3.py method .buildTransaction to incorporate these three variables into our transaction. I'm also adding in my friend's Ethereum address and will send him 10 Dai:
>>> transaction = dai.functions.transfer('0xafC2F2bBD4173311BE60A7f5d4103b098D2703e8', 0x10).buildTransaction({'chainId': 4, 'gas':70000, 'nonce': w3.eth.getTransactionCount('0x5b580eB23Fca4f0936127335a92f722905286738')})
Signing and Sending Transaction
Now that we have our transaction, we need to sign it with our private key. This is how the peer-to-peer protocol of Ethereum will know that it is this account that wants to send the money. To sign, we put the transaction object and our my_account._private_key into the following function:
>>> signed_txn = w3.eth.account.signTransaction(transaction, '0x265434629c3d2e652550d62225adcb2813d3ac32c6e07c8c39b5cc1efbca18b3')
Note: You should never post your real private key online! This is being done for educational purposes only. Double Note: Until this account is drained of test ether or test dai, the above command will be valid for the Rinkeby network
With our signed transaction, all we need to do now is send it to the network through our Infura API endpoint. We do this through our w3 object with the following command:
>>> txn_hash = w3.eth.sendRawTransaction(signed_txn.rawTransaction)
If that goes through, congratulations! You've just sent money using Python!
To find your transaction, you can print txn_hash and take the string value to Etherscan for Rinkeby. Here's the hash I have (yours will be different!):
>>> txn_hashHexBytes('0xc5f98cbe6f1eaef16916b148e6c4ae926b11ab9dde750e188362745da39d560e')You can see it on the Ethereum testnet here.
As you can see, using web3.py opens up all kinds of possibilities with your applications. In the next tutorial, I'm hoping to do something more built out with proper files and directories. For now, I just wanted to show you some of the incredible options blockchain can provide. I hope you found something interesting! The community is really eager to engage with new folks, be sure to reach out.
Thank you to Daniel Ellison for his feedback and comments, sometimes copied verbatim!
Want to check out more Ethereum developer tutorials?
Subscribe to our newsletter to get dev tools, tutorials, pro tips, and more straight to your inbox.