
Developer Portal
Ethereum Developer
Onboarding: Step 3
In step 3 of our 3-step Ethereum developer onboarding, you'll get set up with Infura, write a smart contract, connect to Ropsten, and tie everything together with React.
Third Steps
So, you’ve got the basics down. In the previous section, you developed a smart contract, and deployed it using Truffle. However, in the previous section, your smart contracts were deployed to a local development network – and that’s no fun, since only you can deploy things and interact with that local test network! We want friends! And access to other smart contracts that other people have deployed!
Therefore, in this section, we’ll transition into utilizing a public Ethereum testnet, so you can join in on all of the action happening around the Ethereum ecosystem!
Let’s Get Started!
First, we’re going to talk about how you get access to these public Ethereum networks.
To access these networks, you need to connect to a node which is connected to the respective network. You can view each Ethereum network as its own little Ethereum world, and you can view an Ethereum node as your gateway or access point to each of those worlds! Because Ethereum is a distributed network, each Ethereum node stores the entire state of the network it is connected to (there are nodes that don’t need to store the full state, but don’t worry about that for now), and constantly communicates with the other nodes in the network to keep that state up-to-date! Therefore, to be able to read from and write to this state, we’ll need to get access to one of these nodes.
You could very well host your own node using one of the many Ethereum clients currently available (Hyperledger Besu (Java client developed by Consensys), Geth (Go client), Parity (Rust client), etc.) – however, there is quite a bit of DevOps overhead that comes with hosting and maintaining your own Ethereum node – especially if you want to do it reliably! As such, we at Consensys have built Infura – a world class Ethereum infrastructure offering. Infura takes care of the whole ‘node management’ piece for you, providing you with instant, reliable, and scalable access to clusters of Ethereum nodes! You can think of Infura as “Ethereum-nodes-as-a-Service” 🙂
Getting Started With Infura
To get started with Infura, you’ll want to register an account at infura.io. Don’t worry – it’s completely free to get started, and you won’t need to enter any sensitive information!
Once registered, you’ll be directed to a page which looks like this:
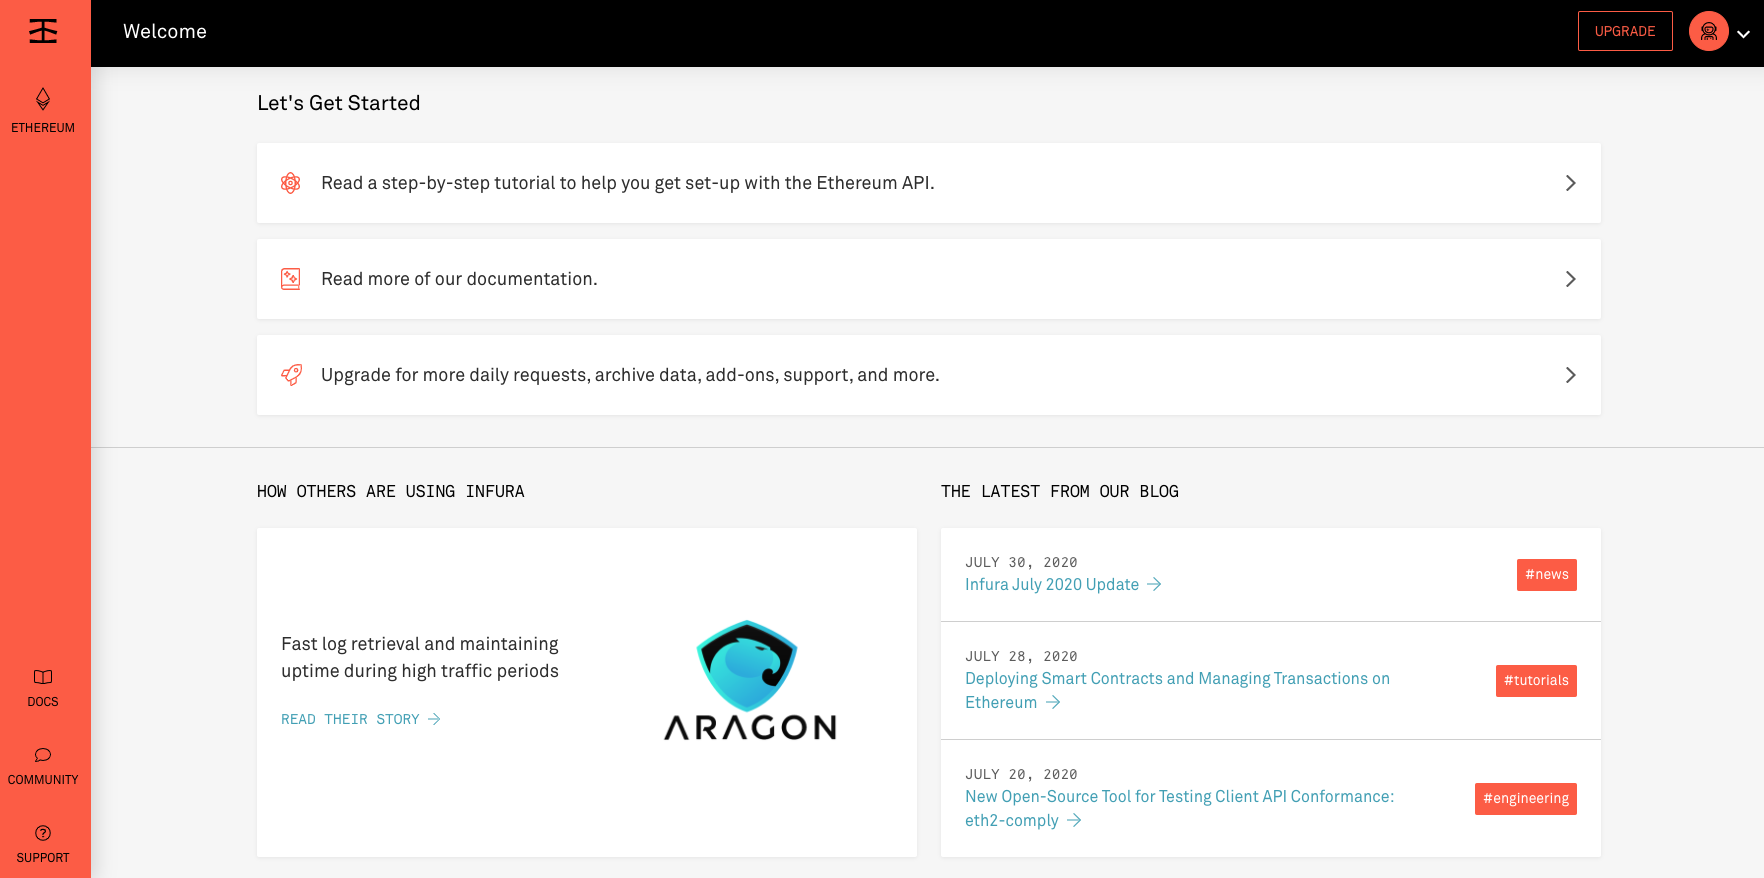
As this page suggests, to get started, you’ll select the first option “Get started and create your first project to access the Ethereum network!”
You can name your project whatever you’d like – we’ll name ours “test-project”.
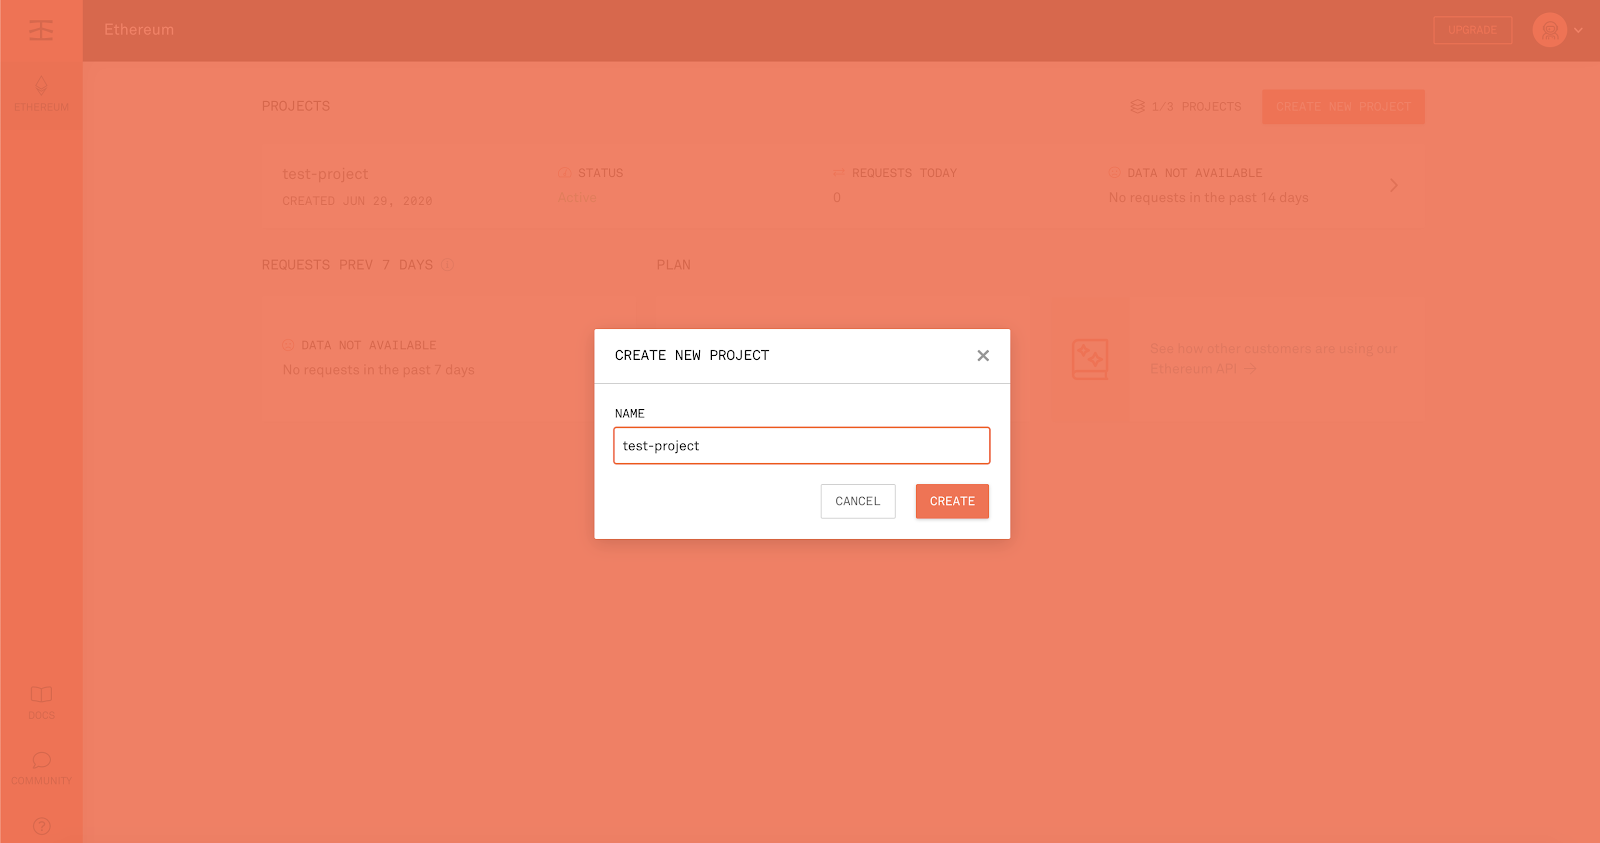
Now, you’ll be presented with the credentials you’ll need to access the Infura nodes!
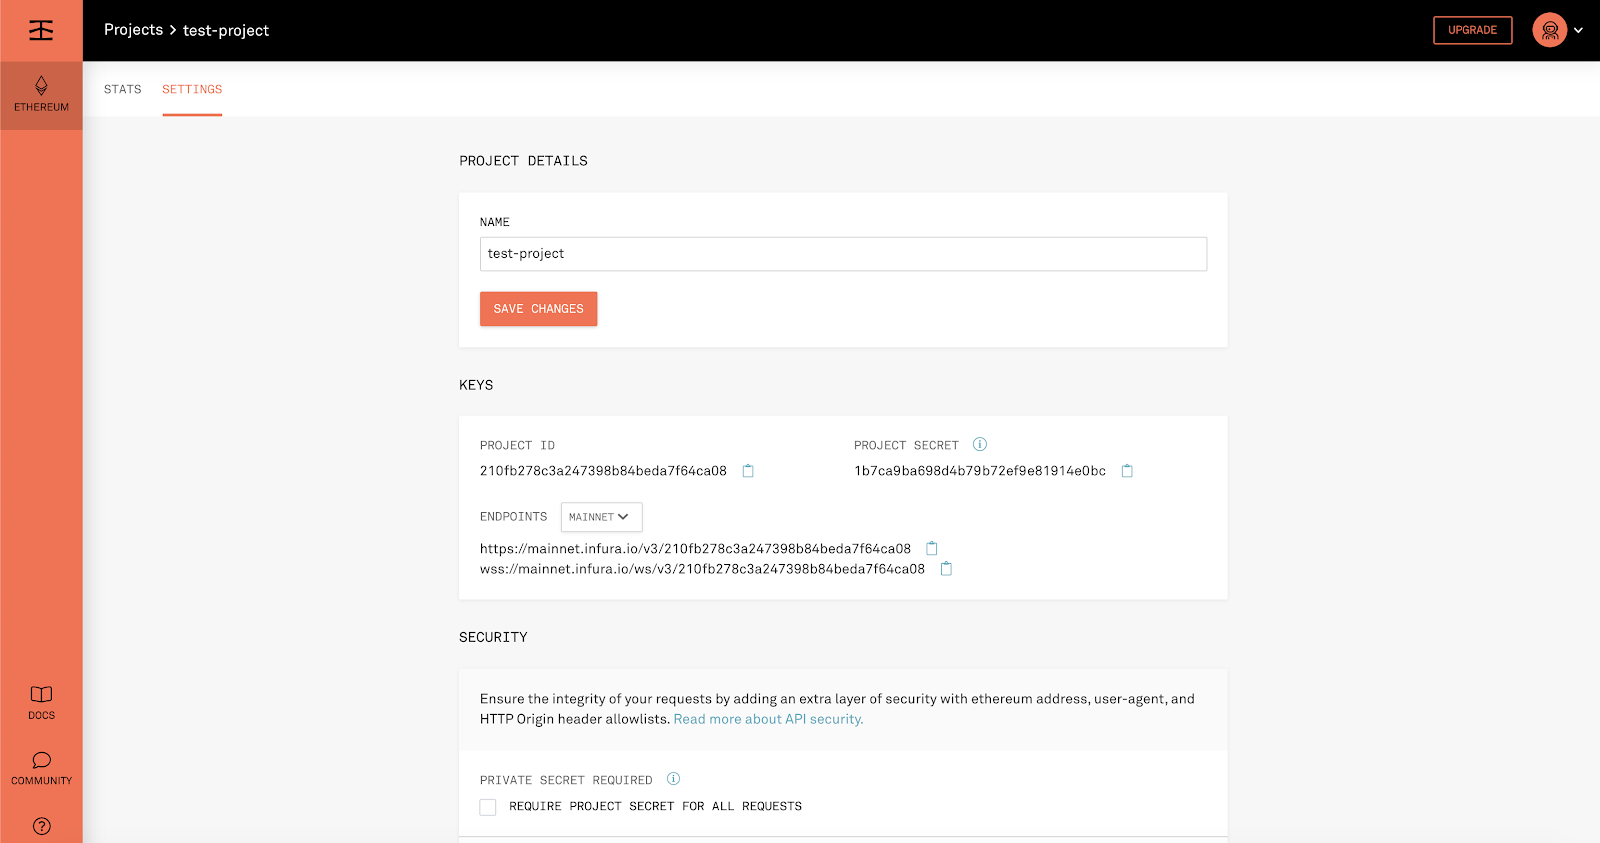
Keep this page open! We’ll be coming back to it later 🙂
The next thing we’ll do is initialize a new Truffle project. If you need help installing Truffle, please refer to the previous section of this documentation.
To initialize a new Truffle project, create a new folder, and run the
truffle init
Next, you’ll want to add the Truffle HD Wallet provider to your newly initialized project, so that you can sign your transactions before they are sent to the Infura nodes. Every state change that you make to Ethereum comes in the form of a transaction – whether it is deploying a contract, calling a function within a contract, or sending a token! Each transaction needs to be signed by an account – therefore, our application needs the ability to sign transactions so that it can make state changes to Ethereum!
Each transaction also costs ether. This transaction cost is referred to as the “gas cost”. Therefore, in order to have our signed transactions be processed by the network once they are sent to the Infura nodes, we’ll need to fund our account with some ether. We’ll cover this a little later, but this is just another important reason why you’ll need a wallet & wallet provider!
To add the Truffle HD Wallet provider to your newly initialized project type in your terminal:
npm install --save @truffle/hdwallet-provider
This may throw some warnings, but as long as it installs, you’re good to go!
Now we can create an Ethereum account for our application to use! Since our wallet provider is an HD (hierarchical deterministic) wallet, we can deterministically generate accounts using the same seed phrase, or mnemonic.
To create our account, we’ll first need to start Ganache. Ganache is a Truffle product which allows us to easily create our own local dev network. To run ganache, simply type
ganache
If you completed Step 2 of this guide, you should have Ganache / ganache-cli already installed – if you don’t, you can install it using the npm command:
npm install ganache --global
Or if you are using yarn
yarn global add ganache
Next, we’ll need to allow our app to talk to Ganache. Head over to your project directory and checkout the truffle-config.js file, simply uncomment (or add) the following lines under network:
development: { host: "127.0.0.1", // Localhost (default: none) port: 8545, // Standard Ethereum port (default: none) network_id: "*" // Any network (default: none) },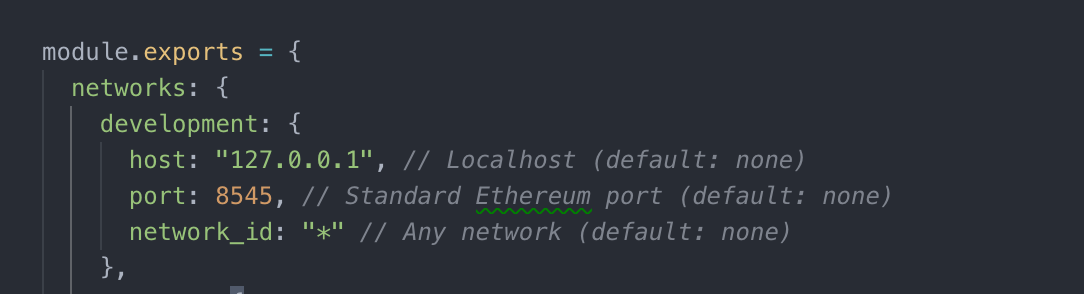
Nice! Now our app can talk to our Ganache development network running at 127.0.0.1:8545! Now, in a new terminal window (but still in your project folder), run the command
truffle console
to connect to your Ganache network. Don’t worry – we’ll be connecting to a public network later! We just need to connect to Ganache right now to create our keys 🙂
Note: If you are running into issues make sure in Ganache your RPC Server port number matches your truffle config file. In the default case, 8545 should work, otherwise change your config file to match Ganache.
Now enter the following commands in the Truffle console to create your wallet:
const HDWalletProvider = require('@truffle/hdwallet-provider');
This should result in a response of “undefined”For your 12-word mnemonic, you can use a mnemonic generator such as this one if you’d like!
MAKE SURE YOU SAVE YOUR MNEMONIC (SEED) PHRASE! We’ll need it later 😃
Next, add the following command in your terminal (while still in truffle development):
const mnemonic = '12 words here';
const wallet = new HDWalletProvider(mnemonic, "http://localhost:8545");
Now, in your truffle console enter the command
wallet
If you scroll up, you should see a list of accounts, like this!
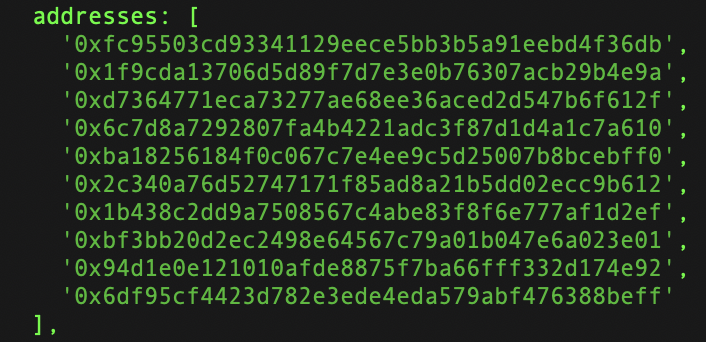
Despite that account being generated while we were connected to Ganache, we can use that same Ethereum account(s) across any Ethereum network (please note, however – although the same account can be used across any Ethereum network, assets / activities pertaining to that account are network-specific – for example, if I make a transaction on the Ethereum Mainnet, that transaction will only occur on the Ethereum Mainnet, and no other network). We are now going to stop interacting with Ganache (local dev network), and start using that account to interact with some public networks!!
Typically, the first thing you’ll need to do when interacting with a public network is obtain some of that network’s ether. In our case, we’ll be connecting to the Ropsten public test network, so we’ll need to obtain some Ropsten ether (ETH)! Don’t worry – test net ETH is free and bountiful, and super easy to obtain 👍
Time to acquire test ETH
To obtain some Ropsten ETH, head over to the Ropsten faucet. Paste in your account address, and viola! You’ve received some Ropsten ETH and can start sending transactions (i.e. making state changes to) the Ropsten network!
For reference, the Ropsten test net is a public Ethereum test network, where you can test your code in an environment that closely mirrors that of the Ethereum mainnet. The main difference between the Ropsten test net (and the other public Ethereum test nets) is that in testnet-land, the ETH is plentiful and has no real-world value! When you start interacting with the Ethereum mainnet, the Ether you use to pay for your transactions (gas costs) will cost ACTUAL dollars – and so we need to make sure we are doing things right beforehand, so that we don’t lose our hard-earned cash / our precious mainnet ETH!
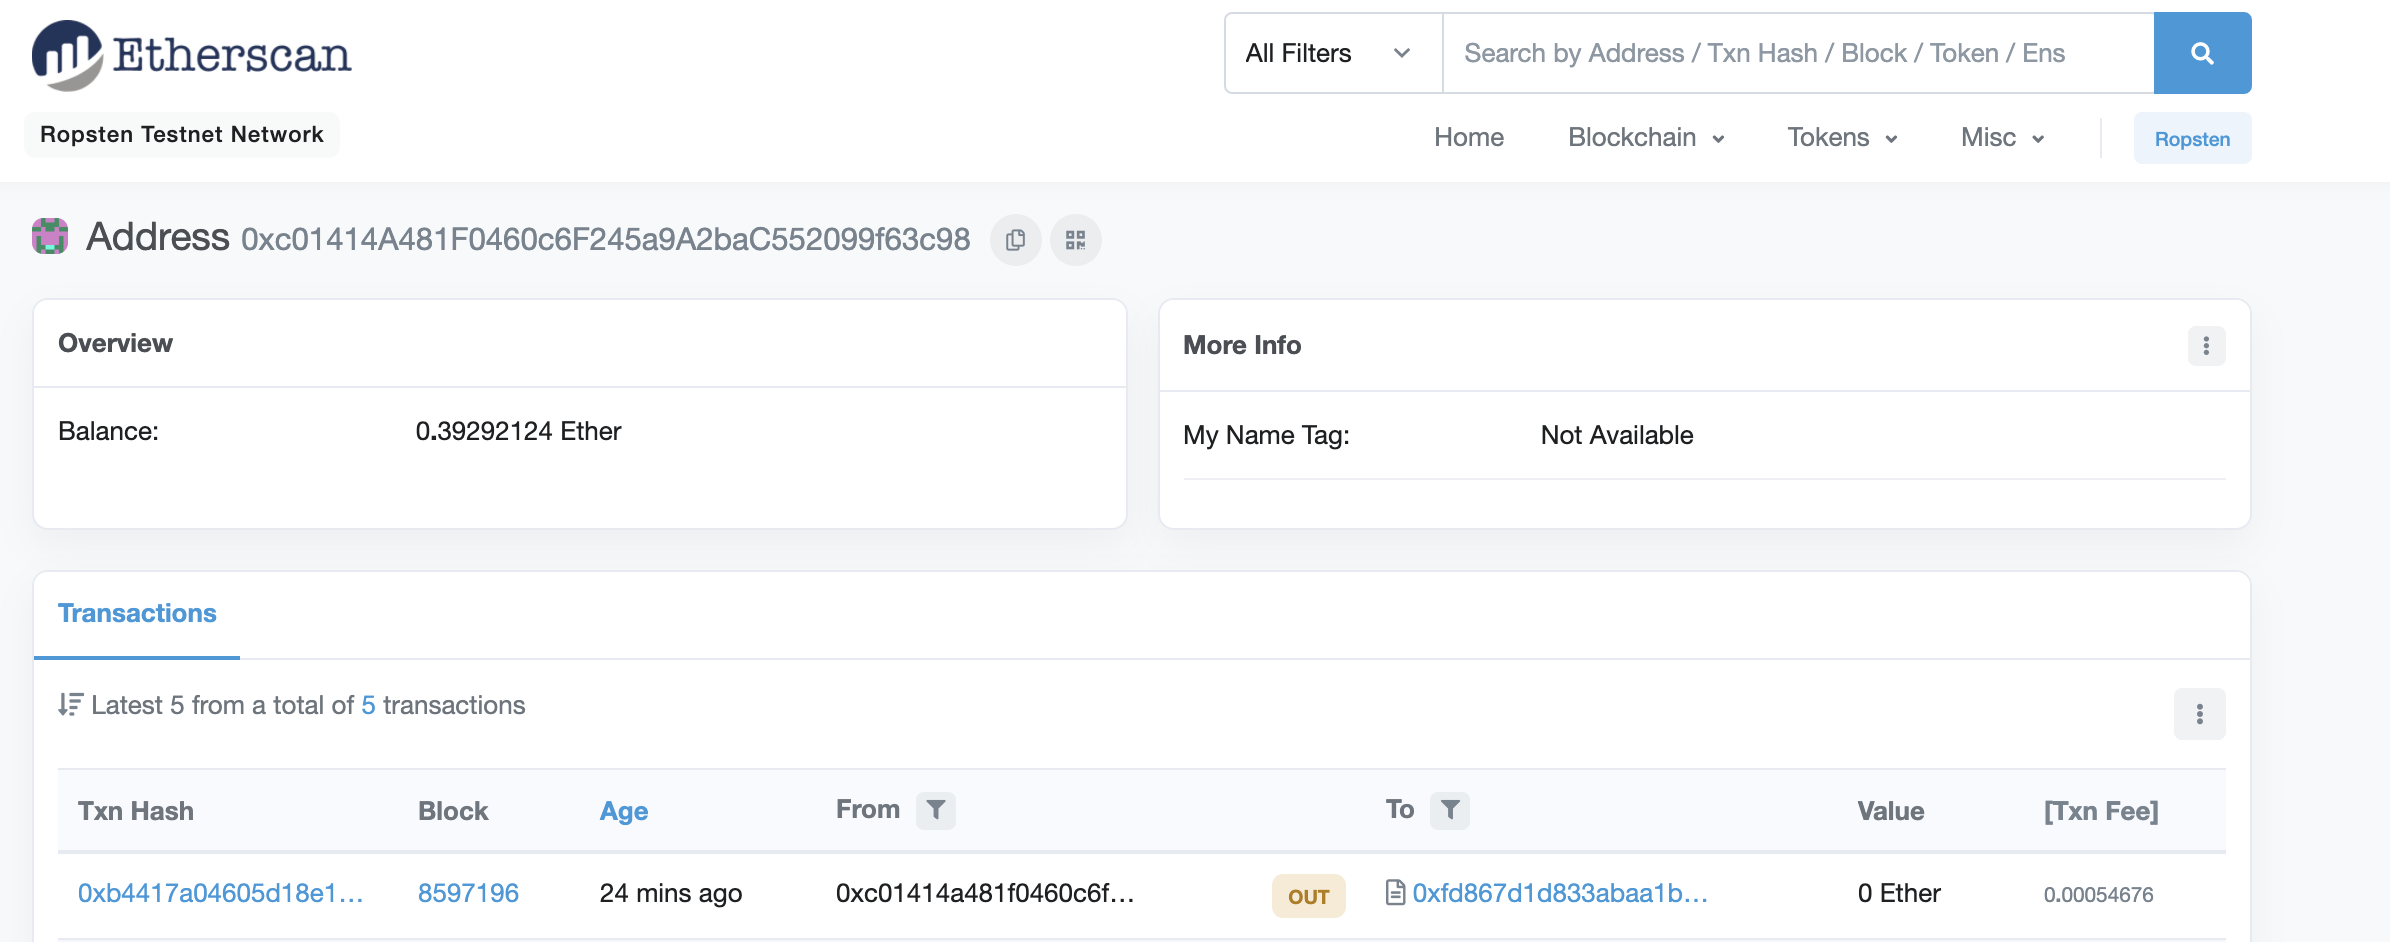
The Ropsten test net, along with most of the other public test networks, has many block explorers for you to view the activity happening on-chain (https://ropsten.etherscan.io/). To see your funded account, simply paste your account’s address into the explorer – and you can view all of the history associated with it:
Alright! Now that we’ve got our wallet provider and an account funded with Ropsten ETH, we can head back into our project, and point it at the Infura nodes connected to the Ropsten test net.
The first thing we’ll want to do is create a .env file to house our precious SECRETS! These secrets include our Infura API key (generated when we created our Infura account), and our mnemonic phrase.
At the root level of your project, simply create a new file “.env”. Also, you’ll need to install the dotenv NPM package by entering the the following command in the terminal
npm install --save dotenv
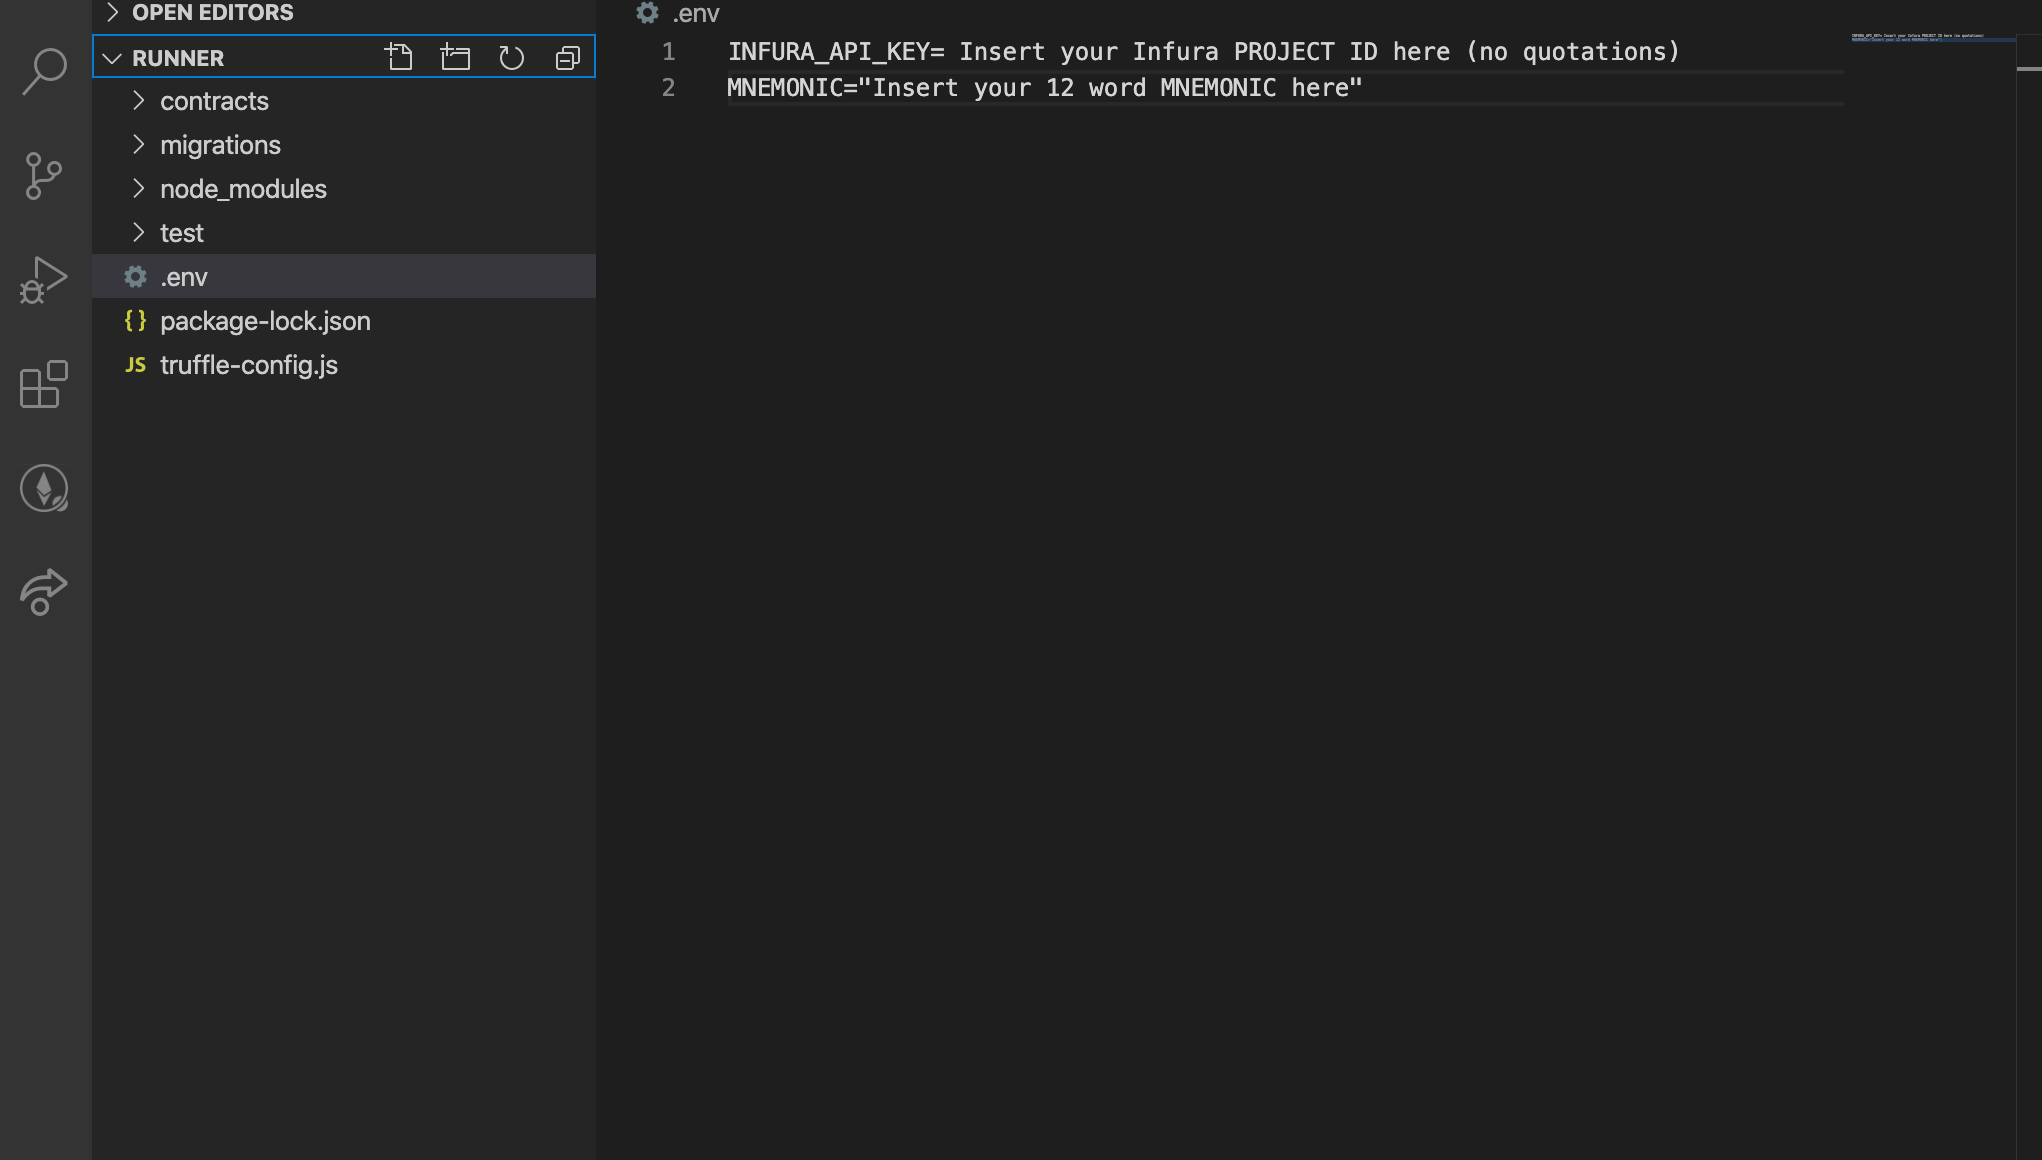
In this new .env file, you’ll need two things:
INFURA_API_KEY=INSERT YOUR API KEY HERE (no quotations)MNEMONIC=”lens whale fan wire bubble online seat expose stock number sentence winner”
INFURA_API_KEY is the Project ID from the project you previously created in infura:

And MNEMONIC is the 12-word seed phrase you previously used to generate your account.
Your file should now look like this:
Alright, we’re getting close!
NOTE: If you are going to push this to a Github repository, or make this project public in any way, MAKE SURE to have your .env file in .gitignore so that your secrets do not get exposed!
Now, we’re going to need to head over to the truffle-config.js file. In here, we’ll need to add a few things to denote our provider (which is used to interact with the Infura (the Truffle HDWallet Provider we previously installed), and point our app at the Ropsten Infura nodes.
At the top of the file, add:
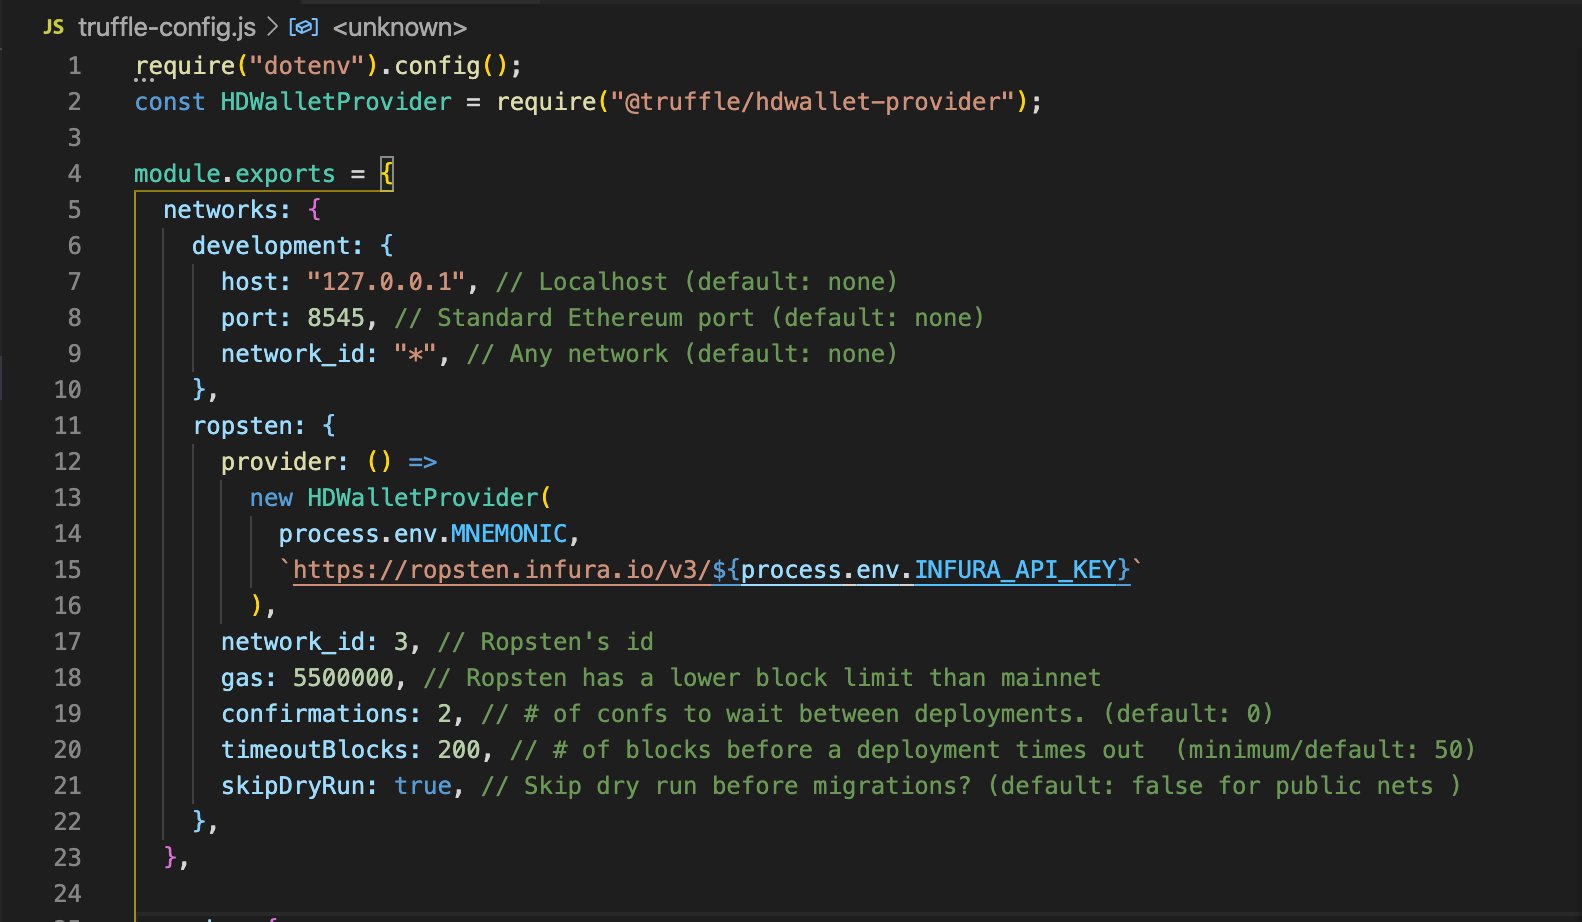
require("dotenv").config();const HDWalletProvider = require("@truffle/hdwallet-provider");Next, under “networks”, you’ll want to add the following network:
ropsten: { provider: () => new HDWalletProvider( process.env.MNEMONIC, `https://ropsten.infura.io/v3/${process.env.INFURA_API_KEY}` ), network_id: 3, // Ropsten's id gas: 5500000, // Ropsten has a lower block limit than mainnet confirmations: 2, // # of confs to wait between deployments. (default: 0) timeoutBlocks: 200, // # of blocks before a deployment times out (minimum/default: 50) skipDryRun: true // Skip dry run before migrations? (default: false for public nets ) }Now your truffle-config.js file should look something like this!
Side note:If you are using Infura endpoints, the `from` parameter is required, as they don’t have a wallet. If you are using Ganache or Geth RPC endpoints, this is an optional parameter.
NOW WE ARE READY FOR THE MAGIC! It’s time to deploy a smart contract to ROPSTEN!
Setting Up a Smart Contract
Solidity setup
First, we’ll want to create a smart contract to deploy! You can grab the smart contract that you developed in the previous section of this guide, build your own smart contract, or just use the following (extremely simple) sample contract:
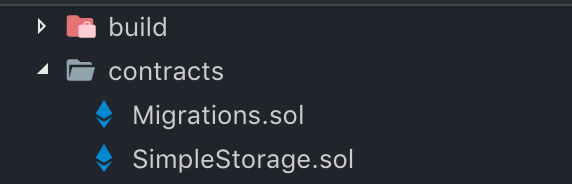
pragma solidity >=0.5.8;contract SimpleStorage { uint256 storedData; function set(uint256 x) public { storedData = x; } function get() public view returns (uint256) { return storedData; }}This contract should be created as a “.sol” (Solidity) file in the “contracts” folder of your project (in this scenario, we’ve created the SimpleStorage.sol file, which is our SimpleStorage contract:
Migration setup
Next, we’ll need to set up our migration file!
Migrations are JavaScript files that help you deploy contracts to the Ethereum network. These files are responsible for staging your deployment tasks, and they’re written under the assumption that your deployment needs will change over time. As your project evolves, you’ll create new migration scripts to further this evolution on the blockchain. A history of previously run migrations is recorded on-chain through a special Migrations contract. You can find more information about them here.Our migration file to deploy our contract will look like this:
const SimpleStorage = artifacts.require("SimpleStorage.sol");module.exports = function(deployer) { deployer.deploy(SimpleStorage);};Save this file in the “migrations” folder under the name “2_deploy_contracts.js”.
Deploying Your First Public Contract
Time to migrate
Now you’re ACTUALLY ready for the MAGIC TO HAPPEN! Head back to the console, and type
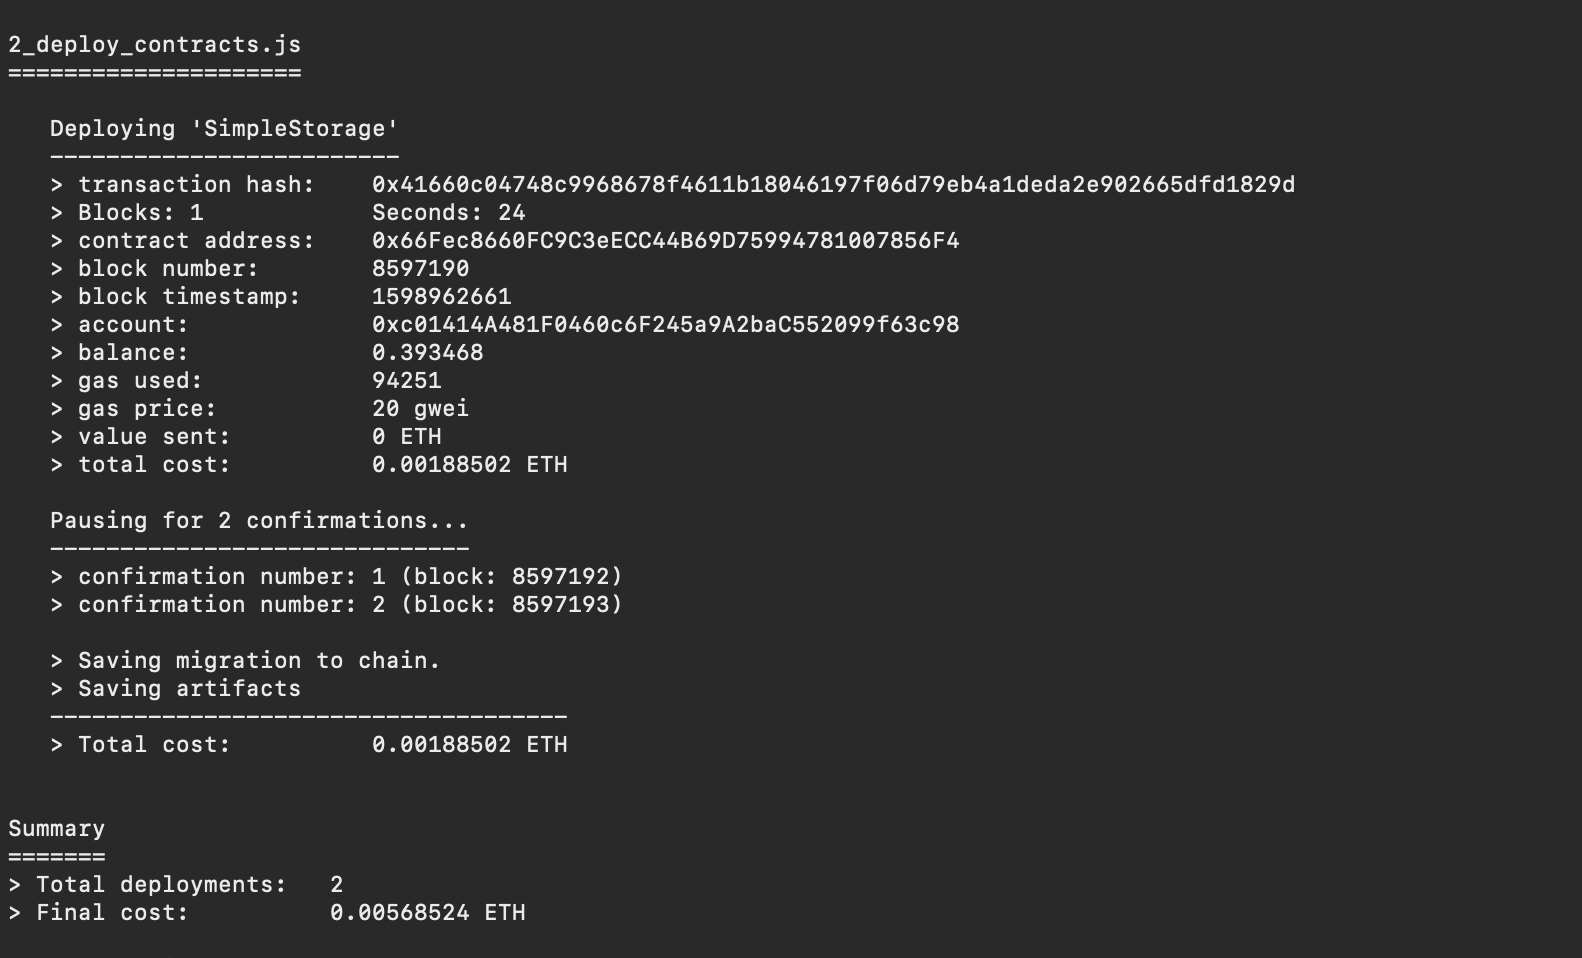
truffle migrate --network ropsten
Boom!💣 Your code was deployed to the public Ropsten Ethereum Test Net!!!
What just happened was :
Your Solidity smart contract (in the “contracts” folder) was compiled down to bytecode – the machine-readable code for the Ethereum Virtual Machine to use.
This bytecode, + some other data, was bundled together into a transaction.
That transaction was signed by your account.
That transaction was sent to the Infura node that is connect to Ropsten.
The transaction was propagated throughout the network, picked up by a Ropsten miner, and included in a Ropsten block.
Your smart contract is now LIVE on the Ropsten blockchain!
You can view your contract using Etherscan: https://ropsten.etherscan.io/ – simply paste in the contract’s address (should be in your terminal) to view it!
Amazing! We’ve just deployed our very first smart contract to a PUBLIC Ethereum network! 🤯
The process is the exact same for deploying to Ethereum mainnet, except you’ll swap out the network in the truffle-config.js file for the Ethereum mainnet (and, of course, run the mainnet Truffle migration command instead of the Ropsten one)! We won’t walk you through this process here, because deploying to the Ethereum mainnet will cost you actual $’s – but if you’d like assistance with this, hop on over to the Consensys Discord and we’d be more than happy to help!
Building a Web3 Frontend
Now that we’ve deployed our contract to Ropsten, let’s build a simple user interface to interact with it!
Note: dApp “front-ends” are just your everyday, regular old front-ends – as such, we can use all of our old tools we are familiar with (create-react-app, etc.) to spin up our front end, and then just add a few things to allow the front end to read from and write to Ethereum! This means, all of your old web dev skills are directly transferable to Ethereum-land / Web3!!
Spin up our React project
Alright, let’s get started.
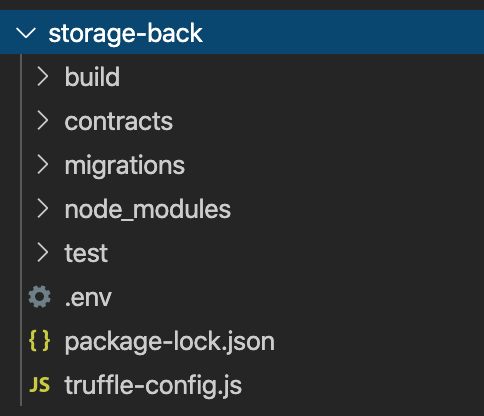
First make sure you have a directory that contains all of the info we just made for our storage contract. I’ve named my folder “storage-back” and it contains the work we just completed to get our contract setup and deployed.
Now we are going to start by spinning up a react project, let’s call ours in this example “storage-lab”
In our terminal let’s run the following to start our project
npx create-react-app storage-lab
Now that we’ve got our new project boilerplate, let’s head into the project directory
cd storage-lab
Now that we are inside of our project we will now add the Web3 package, which will allow our project to interact with Ethereum! More on web3 here
npm install web3
Web3 is one of two major packages we can use, the other being ethers.js. For this example we will be using web3 but if you wanted to read more about ethers.js have a look here
For a detailed explanation of the two, take a look at this write up web3 vs ethers
Great! We are now almost ready to have our react project interacting with our contract!
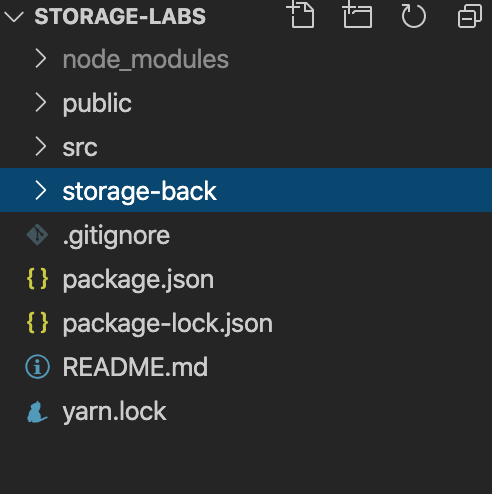
First, let’s take our directory from earlier (for me it’s “storage-back”) which just contains the work we’ve already done involving our smart contracts and now let’s add that to our new react project. This will live on the same level as our src, and now we should have everything we need together inside of our react REPO.
Next, we will need to set up our file containing our ABI information.
“ABI?”
Glad you asked!
The Contract Application Binary Interface (ABI) is the standard way to interact with contracts within the Ethereum ecosystem, both from outside the blockchain and for contract-to-contract interaction. When we compiled our SimpleStorage contract in an earlier step, it created a JSON file for us. Check for yourself, we have a SimpleStorage.json file inside of our build / contracts
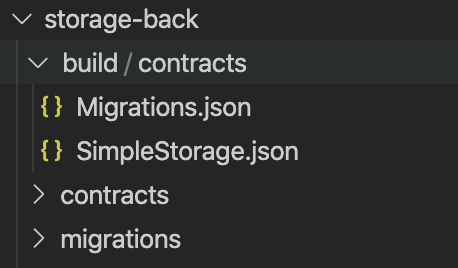
An initial look at this file will reveal a lot of information, right now we only need to focus on the ABI in order to sync our contract up with the front end we are developing. This JSON contains the information we need to communicate our contract with our front end.
Our ABI is an array which holds objects. Looking at the file closer you can see each of those objects are actually each function our SimpleStorage contract contains.
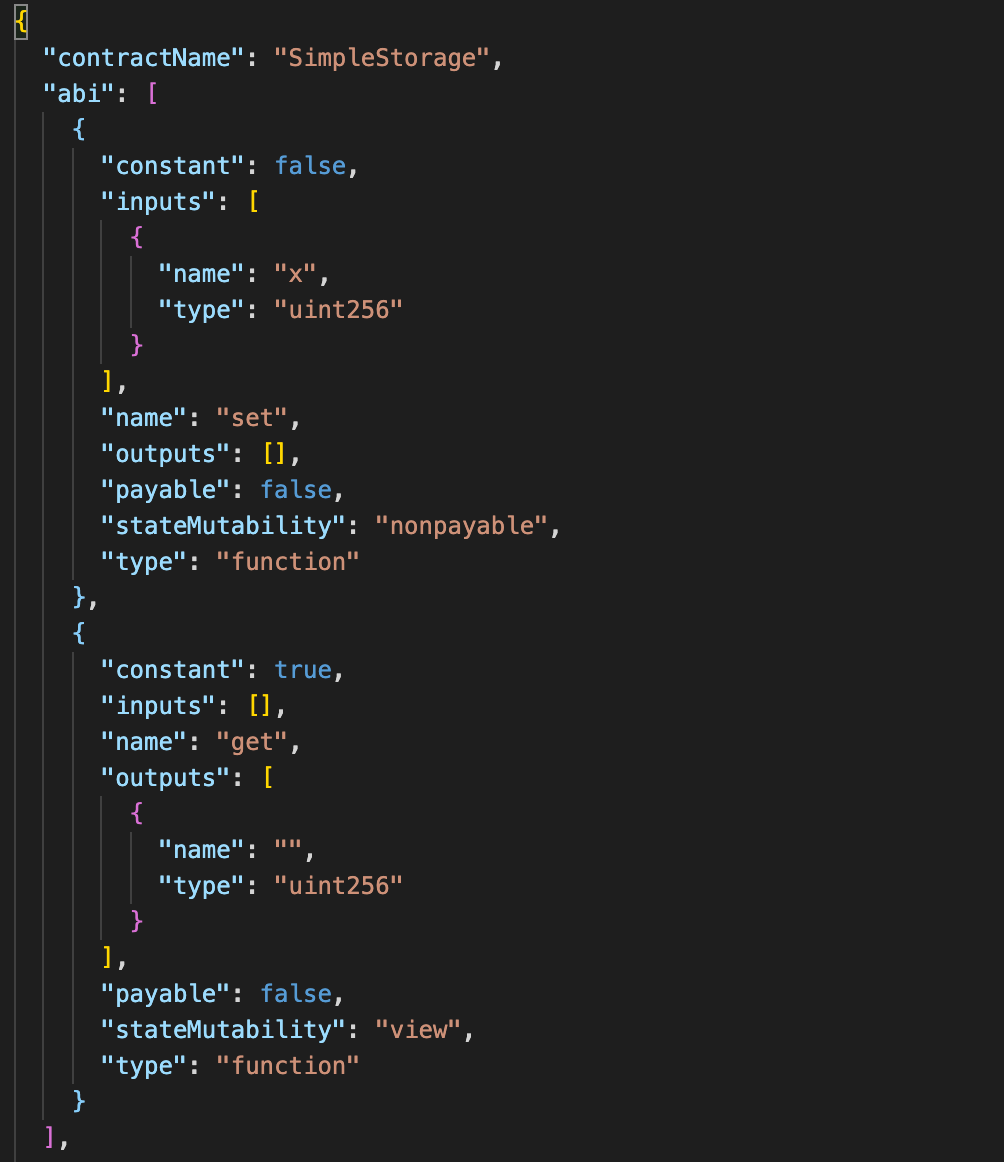
You can quickly see“name”: “set”“name”: “get”both with a “type: “function” both of the functions we declared when writing our smart contract!
Although Truffle obfuscates away the next few steps, we’re going to walk through a much more “manual” way of doing things so that you’re exposed to all of the basics 🙂
First, go ahead and copy your abi information – we will need it in just a moment.
Let’s create a folder inside of our src named “abi”.
Inside of our freshly made abi folder let’s now make a file named abi.js
Note: We don’t technically need to have this separation and could just add our abi.js to our src, but keeping our abi.js files contained helps with organization.
Now we will copy our abi array we grabbed earlier from the SimpleStorage.JSON file and add it to our newly made abi.js file. We will change the file a bit to allow our project to import the information into our App.js. Don’t forget since this is a .js file, we need to add an export so we have the ability to pull it into our app.js later. Let’s name the const the same as the contract, except with camelcase (see code below):
This will be the code we store in our abi.js file
export const simpleStorage = [ { constant: false, inputs: [ { name: "x", type: "uint256", }, ], name: "set", outputs: [], payable: false, stateMutability: "nonpayable", type: "function", }, { constant: true, inputs: [], name: "get", outputs: [ { name: "", type: "uint256", }, ], payable: false, stateMutability: "view", type: "function", },];Time to head to our App.js and import both web3 and our freshly made abi.js file.We are also going to use hooks in this example (which is why we are also importing {useState} you can read more about useState here.
The top of our App.js file should now look like this:
import React, { useState } from "react";import { simpleStorage } from "./abi/abi";import Web3 from "web3";import "./App.css";We now need to make sure we have the ability for any arbitrary users to have the ability to connect and use our dApp , so long as they have a wallet provider!The main wallet used in the Ethereum space for dApp interaction is MetaMask, introduced in Step 1.
If you don’t have MetaMask, visit metamask.io.
With MetaMask installed, we can access our wallet inside of our dapp with:
const web3 = new Web3(Web3.givenProvider);
“Web3.givenProvider” will be set in a Ethereum supported browser.(you can read more about why this is necessary here)
So now our code should look like this:
import React, { useState } from "react";import { simpleStorage } from "./abi/abi";import Web3 from "web3";import "./App.css";const web3 = new Web3(Web3.givenProvider);Ok! So far we’ve:
Spun up a React project
Installed Web3
Added our folder containing our build + contract + migration to our React project
Created an abi.js file holding the abi data we pulled from SimpleStorage.json
Imported the data we need to interact with our contract
Created a variable which allows our dApp to communicate with the user’s wallet
Again, although Truffle makes the next few steps unnecessary (we’ll walk you through a much simpler version later), we’ll add a bit more manual complexity to our dApp for educational purposes.
What we’ll do now is create two new variables: one to store the address of the contract we deployed on Ropsten, and the other to match that contract to our ABI, so that our app knows how to talk to it!
To locate the contract address, navigate to the JSON file we were in earlier (which contains the ABI (SimpleStorage.json)), and scroll to the bottom. The address is in the “address” field here:
"compiler": { "name": "solc", "version": "0.5.8+commit.23d335f2.Emscripten.clang" }, "networks": { "3": { "events": {}, "links": {}, "address": "<b>0x24164F46A62a73de326E55fe46D1239d136851d8</b>", "transactionHash": "0x1f02006b451b9e85f70acdff15a01c6520e4beddfd93a20e88a9b702a607a7b0" } }, "schemaVersion": "3.0.16", "updatedAt": "2020-06-30T20:45:38.686Z", "devdoc": { "methods": {} }, "userdoc": { "methods": {} }}Alternatively, you could head over to https://ropsten.etherscan.io/ and look up the address of the account that deployed the contract! In Etherscan, clicking on the “Contract Creation” will expose the Contract Address itself.
Now we will take the copy of your contract’s address and create a new variable to store it.
Without this, we won’t have the ability to communicate with the contract and our dApp won’t work as intended.
You’ll add this under our const web3 = new Web3(Web3.givenProvider);
const contractAddress = "your contract address here";
Then we will create another new variable named “storageContract” which will contain both our contract address (so our app knows where the contract is), and the ABI (so our app knows how to interact with the contract).
const storageContract = new web3.eth.Contract(simpleStorage, contractAddress);
Our App.js should now look like this
import React, { useState } from "react";import { simpleStorage } from "./abi/abi";import Web3 from "web3";import "./App.css";const web3 = new Web3(Web3.givenProvider);const contractAddress = "your contract address here";const storageContract = new web3.eth.Contract(simpleStorage, contractAddress);We now need to get our hooks to hold variables that will interact with our contract and front end. We will do this by declaring the following within our app function:
import React, { useState } from "react";import { simpleStorage } from "./abi/abi";import Web3 from "web3";import "./App.css";const web3 = new Web3(Web3.givenProvider);const contractAddress = "your contract address";const storageContract = new web3.eth.Contract(simpleStorage, contractAddress);function App() { const [number, setUint] = useState(0); const [getNumber, setGet] = useState("0");Our first usage of useState(0) will hold the uint256 the user declares.
(the naming conventions of number, setUint, getNumber, setGet hopefully help show what is happening)useState (“0”) value acts as a placeholder until we have confirmation on our signed action (our declared uint256)setUint we will soon call on in our return (more on this later)
Time for our logic
Next we will add our numberSet and NumberGet logic (we add numberSet within our function App)
const numberSet = async (t) => { t.preventDefault(); const accounts = await window.ethereum.enable(); const account = accounts[0]; const gas = await storageContract.methods.set(number).estimateGas(); const post = await storageContract.methods.set(number).send({ from: account, gas, }); }; const numberGet = async (t) => { t.preventDefault(); const post = await storageContract.methods.get().call(); setGet(post); };We set a preventDefault (details on preventDefault found here)We also use an async call on get for the contract (details on async found here)
Our hook setGet() stores a default value we initially view (“0”)
const accounts = await window.ethereum.enable();
makes sure we are calling our connected address via MetaMask.
const account = accounts[0];
Pulls in the connect account
You might be wondering whats going on with const gas = await storageContract.methods.set(number).estimateGas();
Our app needs permission to access user funds to pay for gas fees, any functions requesting ether regardless if it’s on testnet or mainnet. This is where our connection to MetaMask comes in handy to sign for this usage to set our uint256 and pay for it (with test ETH).
So for any function that needs gas, you have to calculate the potential gas used.The “Set” function of our contract requires gas“Get” does not.(this is because “Get” is viewing what has already been declared with “Set”)
const post is going to take the passed in uint256, confirm the transaction (post paying gas fee) from your MetaMask wallet on the Ropsten network.
Next we pass the functions parameters via methods.set() and with our declared address (users address) we then handle the Set function.
We create our smart contract transaction by passing in our function parameters to the smart contract methods.set(), and estimated gas and user account address to .send().
const post = await storageContract.methods.set(number).send({ from: account, gas, });This should be all of the logic we need to cover our numberSet.
Now we need our numberGet
const numberGet = async (t) => {t.preventDefault(); const post = await storageContract.methods.get().call(); setGet(post); };Our const post retrieves our set number and setGet passes in the new value we declared
So our “0” will onClick refer to our numberGet and render our unint256!
So now your app.js should look like this
import React, { useState } from "react";import { simpleStorage } from "./abi/abi";import Web3 from "web3";import "./App.css";const web3 = new Web3(Web3.givenProvider);const contractAddress = "your contract address";const storageContract = new web3.eth.Contract(simpleStorage, contractAddress);function App() { const [number, setUint] = useState(0); const [getNumber, setGet] = useState("0"); const numberSet = async (t) => { t.preventDefault(); const accounts = await window.ethereum.enable(); const account = accounts[0]; const gas = await storageContract.methods.set(number).estimateGas(); const post = await storageContract.methods.set(number).send({ from: account, gas, }); }; const numberGet = async (t) => { t.preventDefault(); const post = await storageContract.methods.get().call(); setGet(post); };Let’s create a very basic return to render so we can test if we can
set a unint256 value,
Pull up our metamask wallet and confirm the transaction
Pay the gas cost
then get the value (unint256) we stored once the transaction has completed.
Our return looks like this:
return ( <div className="main"> <div className="card"> <form className="form" onSubmit={numberSet}> <label> Set your uint256: <input className="input" type="text" name="name" onChange={(t) => setUint(t.target.value)} /> </label> <button className="button" type="submit" value="Confirm"> Confirm </button> </form> <br /> <button className="button" onClick={numberGet} type="button"> Get your uint256 </button> {getNumber} </div> </div> );}export default App;Some quick CSS
Let’s now head over to the App.css file, delete the boiler plate code and add this instead
.main { text-align: center; display: flex; justify-content: center; background-color: #f2f1f5; height: 100vh;}.card { min-height: 50vh; width: 50vw; display: flex; flex-direction: column; align-items: center; justify-content: center;}.form { height: 20vh; width: 20vw; display: flex; justify-content: space-evenly; flex-direction: column;}.button { width: 20vw; height: 5vh;}Now we are ready to test!
In your terminal run
yarn start
In our localhost:3000 we should look like this
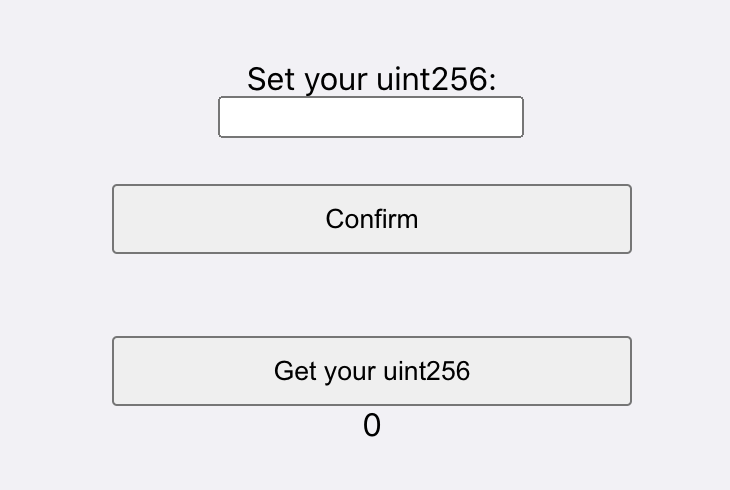
We should now be able to enter a unint256 value in our input field!After we confirm our number in our dApp we then sign via MetaMask (Make sure your wallet is set to the Ropsten network)
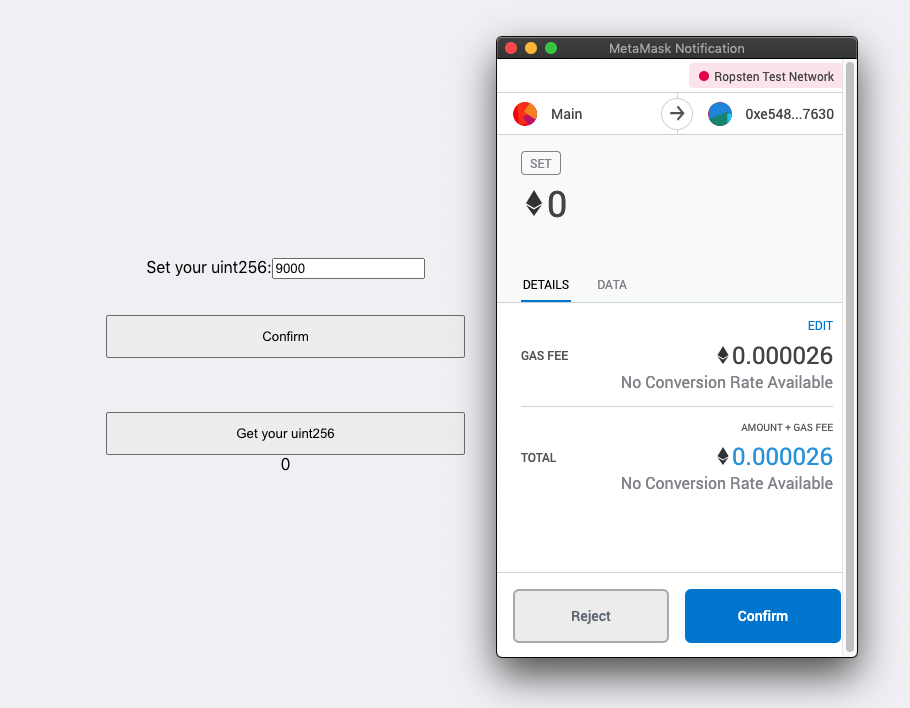
We did it! 🤗
We now have our smart contract connected to a front end and have the ability to manipulate the Set function (provided we have the test ETH to pay the gas fee for the transaction). Then we can call on the Get function and retrieved the stored uint265 value.
Pretty cool huh!?!
Extra Styling
Now it’s time to show how easy it can be to implement even more popular Web2 tech into our project.We are going to be using MUI to add basic styling, if you develop with React already you might be familiar with material-ui. (Details found here) Material-UI or MUI for short is a very popular React framework that allows you to quickly spin up a project with a lot of styling cooked in provided you follow the naming conventions. It’s also very easy to manipulate if you’re looking to just use a foundation and customize from there.
*This will be a very short example of how to add MUI to a project with small additions to demonstrate how quickly you can incorporate our project as it stands with a Web2 tech.
Adding MUI
We will start by running the command (while still in our project directory in the terminal (if you’re app is still running, you’ll need to close it (ctrl+c), or open a new tab)):To install with npm:
npm install @material-ui/core
Or with yarn:
yarn add @material-ui/core
Now that we have MUI injected we will start with changing our styling. At the top of our app.js file we are going to import a few new things:
import { simpleStorage } from "./abi/abi";import Button from "@material-ui/core/Button";import TextField from "@material-ui/core/TextField";import { makeStyles } from "@material-ui/core/styles";CopyJavaScript
The import of { makeStyles } allows us to manipulate the styling (in this case) our buttons and text field along with importing the default MUI styling.
We will now make a variable (above our function) which brings in the boilerplate styling from MUI
const useStyles = makeStyles((theme) => ({ root: { "& > *": { margin: theme.spacing(1), }, },}));Now within our App function we will also add a variable named “classes” pulling in the defined styles we just declared above.
function App() { const classes = useStyles(); const [number, setUint] = useState(0); const [getNumber, setGet] = useState("0");We will now make adjustments within our return to replace some of our fields with what we’ve just imported.
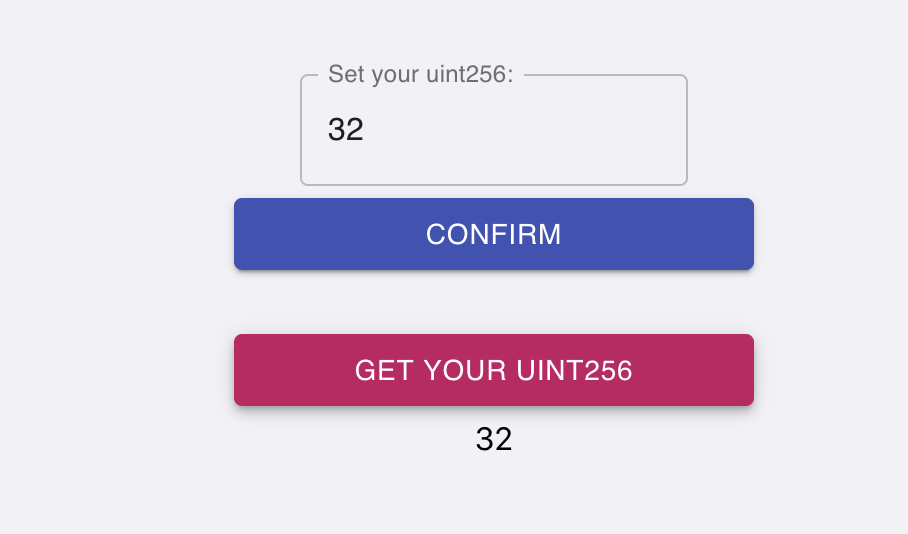
return ( <div className={classes.root}> <div className="main"> <div className="card"> <TextField id="outlined-basic" label="Set your uint256:" onChange={(t) => setUint(t.target.value)} variant="outlined" /> <form className="form" onSubmit={numberSet}> <Button variant="contained" color="primary" type="submit" value="Confirm" > Confirm </Button> <br /> <Button variant="contained" color="secondary" onClick={numberGet} type="button" > Get your uint256 </Button> {getNumber} </form> </div> </div> </div> );}export default App;Your code should now look like this
import React, { useState } from "react";import { simpleStorage } from "./abi/abi";import Web3 from "web3";import "./App.css";import { makeStyles } from "@material-ui/core/styles";import Button from "@material-ui/core/Button";import TextField from "@material-ui/core/TextField";const useStyles = makeStyles((theme) => ({ root: { "& > *": { margin: theme.spacing(1), }, },}));const web3 = new Web3(Web3.givenProvider);const contractAddress = "your contract address here";const storageContract = new web3.eth.Contract(simpleStorage, contractAddress);function App() { const classes = useStyles(); const [number, setUint] = useState(0); const [getNumber, setGet] = useState("0"); const numberSet = async (t) => { t.preventDefault(); const accounts = await window.ethereum.enable(); const account = accounts[0]; const gas = await storageContract.methods.set(number).estimateGas(); const post = await storageContract.methods.set(number).send({ from: account, gas, }); }; const numberGet = async (t) => { t.preventDefault(); const post = await storageContract.methods.get().call(); setGet(post); }; return ( <div className={classes.root}> <div className="main"> <div className="card"> <TextField id="outlined-basic" label="Set your uint256:" onChange={(t) => setUint(t.target.value)} variant="outlined" /> <form className="form" onSubmit={numberSet}> <Button variant="contained" color="primary" type="submit" value="Confirm" > Confirm </Button> <br /> <Button variant="contained" color="secondary" onClick={numberGet} type="button" > Get your uint256 </Button> {getNumber} </form> </div> </div> </div> );}export default App;Now if we take a look at our react project it should look like this!
Well done!
We still have all of the functionality of before and have now injected an easy to use framework to further customize our project however we want. Have a look at the MUI documentation to experiment with your own additions / modifications!
Bonus Round
It would be nice to show the users connect address within our dApp, wouldn’t it?Well let’s make a very quick and basic component to do exactly that!
We will start by making a separate component that we can import back into our App.js file. It’s a good idea to separate our logic to not only keep our App.js easy to navigate, but also follow the practice of a component ideally only doing one thing. If it ends up growing, it should be decomposed into smaller subcomponents.
Component build out
We will make a new folder called components on the same level as our src and within that folder we will make a Nav.js file. Our project scaffolding should now look something like this
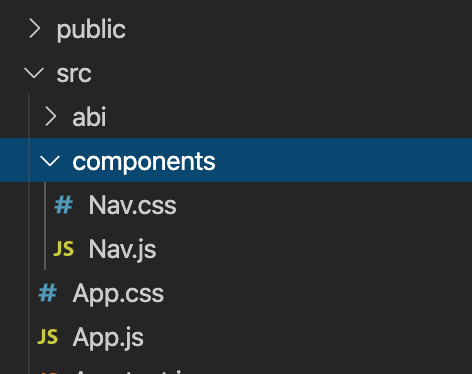
We will also make a Nav.css file within our components folder to import any styles we apply specifically to the Nav component.
Let’s open our Nav.js up and let’s import our React, Web3, and our empty .css file
import React from "react";import Web3 from "web3";import "./Nav.css";Now we will make a class called Nav and we’ll add just a few things within it to display our connected address. We will start by setting our state to read the account
class Nav extends React.Component { state = { account: "" };Still within our class we will load the account to read from by adding our async loadAccount logic
async loadAccount() { const web3 = new Web3(Web3.givenProvider || "http://localhost:8080"); const network = await web3.eth.net.getNetworkType(); const accounts = await web3.eth.getAccounts(); this.setState({ account: accounts[0] }); }We will next create a componentDidMount (which will be invoked immediately after the component mounts) In our case pulling in the loaded account. Read more here
componentDidMount() { this.loadAccount(); }Side note:This can be done differently, instead of a class we can create a function and use hooks opposed to componentDidMount, but for the sake of this example we will stick to this method.
We will then create a render above our return, render is a method that is required when you are writing a React component using a class method. Within our return we add a class of address to our div (to give basic styling to later) along a p tag to show the connected address which we fetch using { this.state.account }
render() { return ( <div> Your connected address: {this.state.account} </div> ); }}export default Nav;Our Nav.js file should now look like this
import React from "react";import Web3 from "web3";import "./Nav.css"class Nav extends React.Component { state = { account: "" }; async loadAccount() { const web3 = new Web3(Web3.givenProvider || "http://localhost:8080"); const network = await web3.eth.net.getNetworkType(); const accounts = await web3.eth.getAccounts(); this.setState({ account: accounts[0] }); } componentDidMount() { this.loadAccount(); } render() { return ( <div> Your connected address: {this.state.account} </div> ); }}export default Nav;Let’s head to the Nav.css file and add very basic styling
.address { display: flex; justify-content: center;}You technically could add this to the App.css file, keep in mind though pretty quickly that could get messy. Components should be reusable and to avoid as much friction as possible by compartmentalizing your work it can save you a headache down the road.
Now let’s head back to our App.js and import our newly made component and make sure we add it to our return to display it!
Our finished App.js file should look like this
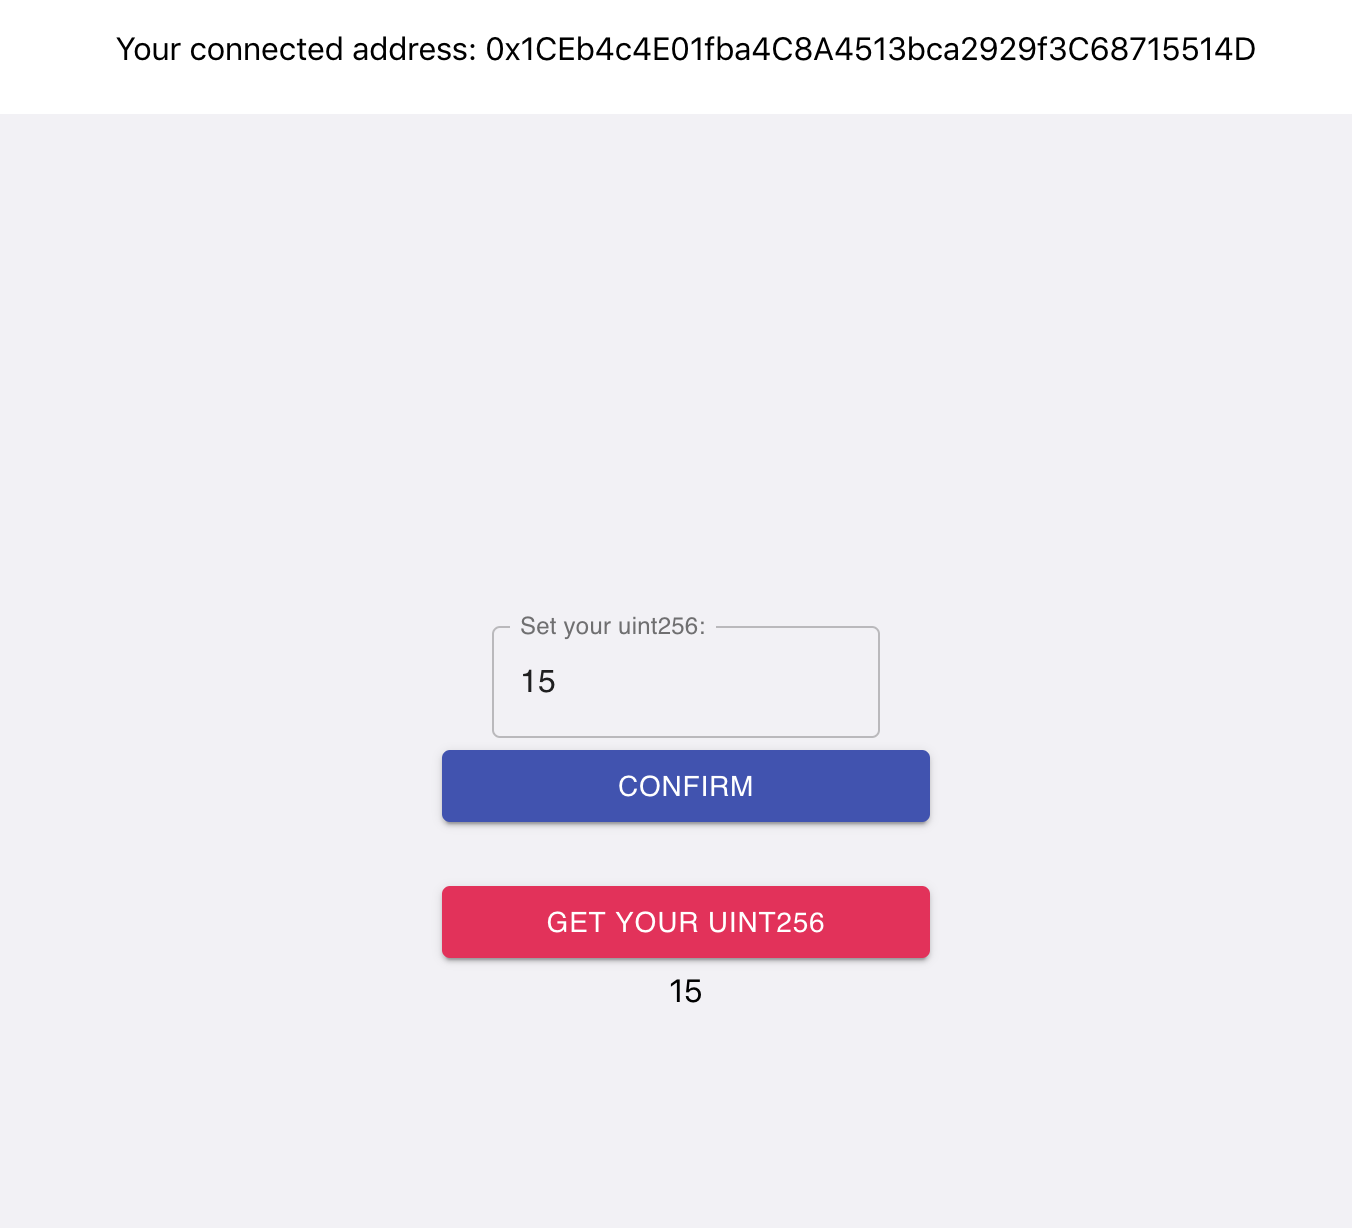
import React, { useState } from "react";import { simpleStorage } from "./abi/abi";import Web3 from "web3";<b>import Nav from "./components/Nav.js";</b>import "./App.css";import { makeStyles } from "@material-ui/core/styles";import Button from "@material-ui/core/Button";import TextField from "@material-ui/core/TextField";const useStyles = makeStyles((theme) => ({ root: { "& > *": { margin: theme.spacing(1), }, },}));const web3 = new Web3(Web3.givenProvider);const contractAddress = "your address here";const storageContract = new web3.eth.Contract(simpleStorage, contractAddress);function App() { const classes = useStyles(); const [number, setUint] = useState(0); const [getNumber, setGet] = useState("0"); const numberSet = async (t) => { t.preventDefault(); const accounts = await window.ethereum.enable(); const account = accounts[0]; const gas = await storageContract.methods.set(number).estimateGas(); const post = await storageContract.methods.set(number).send({ from: account, gas, }); }; const numberGet = async (t) => { t.preventDefault(); const post = await storageContract.methods.get().call(); setGet(post); }; return ( <div className={classes.root}><b> <Nav /></b> <div className="main"> <div className="card"> <TextField id="outlined-basic" label="Set your uint256:" onChange={(t) => setUint(t.target.value)} variant="outlined" /> <form className="form" onSubmit={numberSet}> <Button variant="contained" color="primary" type="submit" value="Confirm" > Confirm </Button> <br /> <Button variant="contained" color="secondary" onClick={numberGet} type="button" > Get your uint256 </Button> {getNumber} </form> </div> </div> </div> );}export default App;We should now see our connected address up top and still retain all of our functionality!
🎉 We did it! 🎉
We now have a dApp that we’ve built from the ground up. We pulled in our smart contract into a React project, wrote logic to make sure we have user functionality, created a component to render the connected address, and we even added a popular styling framework to our project.
Well done! This is just the start for your Web3 development adventures and you already have something to show that you’ve not only created but also wrap your head around. Reach out to us in the Discord and share your project (especially if you’ve made any modifications or additions) with us!
